
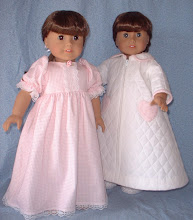
Run, Run, Run
Around the world.
You can't catch me...
I'm the gingerbread GIRL!
Below is this year's thank-you notes we send to those that gave us gifts at Christmas time. Our theme was Gingerbread GIRLS. My youngest was in charge of assembling them this year.
 They are constructed in the same manner you would construct something you planned to applique.
SUPPLIES & TOOLS NEEDED: Small scraps of cotton fabric, fusible web (the kind that can fuse two pieces of fabric together. There is a type that can be sewn and there is a type that should not be sewn. I use the type that should NOT be sewn), 8-1/2 inch by 11 inch cardstock, scissors, and an iron
STEP 1: Find a simple design that you would like to use for the "applique". You can design your own -- just be certain that it is a very plain and simple design. An excellent source can be a coloring book intended for a very young child. You can make a reduced copy of it on a copier.
STEP 2: Decide the colors you want for each detail. For instance, we chose a red print fabric for the gingerbread girl's dress and dark green for collar, cuffs, and shoes. (I sometimes color in the picture to help me decide just what colors I like for each detail.
STEP 3: If you want your card to say something, either print it on by hand or use your computer to do the job for you as I chose to do. If you use the computer, be certain to do it BEFORE you fuse any fabric to the card.
STEP 4: Cut cardstock in half to make to pieces that measure 5-1/2" x 8-1/2". Fold each piece in half to form card.
STEP 5: Make individual patterns of each piece you will be using in the applique design. VERY IMPORTANT NOTE. You will be layering these pieces on top of each other. So when you make your patterns, plan for how the pieces will go down. For instance, for our gingerbread girl. We made a pattern for the entire body of the gingerbread girl. We DID NOT just cut out her face, hands, and legs. Her body would be the foundation for the other pieces. You can make your pattern pieces from paper, but I perfer cardstock because it is easier to draw around and lasts longer if I am making several cards (which is usually the case).
STEP 6: Fuse the fusible web to the wrong side of the material according to the manufacturer's directions. Leave the paper backing attached at this point.
STEP 7: Draw around each pattern piece on the paper backing which you fused on the appropriate fabric. REMEMBER TO DRAW IT THE OPPOSITE OF HOW YOU WISH IT TO APPEAR ON THE FRONT. If you desire a item such as this arrow 3to point to the left on the card, then you must flip it to point right 4when you are drawing around it.
STEP 8: Cut out all pieces.
STEP 9: Now you are ready to begin layering your design on the front of the cardstock. Be certain that your iron is NOT set for steam. You want to use a DRY iron. Also, do NOT use a hot setting (this will scorch the paper). I usually use the "synthetic" setting. Remove the paper backing. Place fusible web next to cardstock and press with the iron. To time how long to hold the iron there, I count from 1 to 10. I also cover the entire card with a piece of thin paper; this saves my iron plate free from any fusible residue.
STEP 10: Continue to layer the design and press in place in the manner described in Step 8.
STEP 11: Now you can add any "fun" little extras you like. For instance, we painted on facial features and buttons. We tied a scrap of fabric into a knot and glued it to her head as a bow. (A girl's got to have a little decoration, you know.) You can use ribbon to make lines or buttons to make wheels on a car. You are limited only by your IMAGINATION!
I usually make up several of one kind when I am making these little notecards. I don't put a message inside ... it makes a cute little blank note card, perfect for a thank you or a short note to a friend. But again, the choice is yours -- a message can be printed inside the card if you like. I've been able to pick up some little envelopes to fit at a local surplus store. You could also make your own.
6 - 10 cards tied together with a ribbon, make a nice little gift.
These are extremely easy to make. I hope this "triggers" your imagination and that you have fun making them.


No comments:
Post a Comment