Bringing Katya Home Blog

Tuesday, September 28, 2010

More Prototypes for American Girl Doll Clothes

Hi again! Well as you can see from the background in these pictures, fall has arrived in Central PA, and the trees are losing some of their leaves. I think this is mainly the result of dry weather because the leaves have not yet really turned colors. Around here in the mountains, we have beautiful displays each autumn.

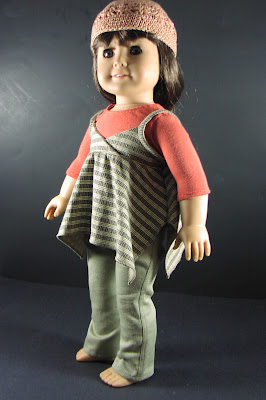
I'm still working on some designs for American Girl dolls. Now before you look any further, remember these are just prototypes of the patterns I am working on -- trial runs to check for fit and such. The outfit is not co-ordinated in color, but a girl can't have her picture taken without having her bottoms on, and these were the jeans she was wearing. Okay? 'nuf said.


This is my shirred-front tank top. It can be worn alone or layered over a tee shirt. I'm really pleased with this. Now I am ready to make a couple in a little "snazzier" fabric. Note to self: shorten shirring by about 1/2".

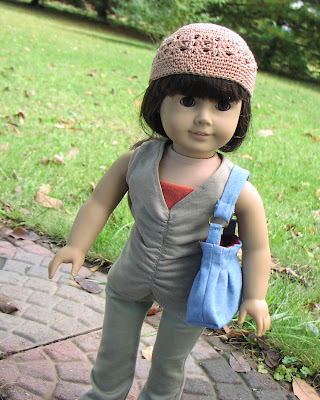
I had been looking for a hobo bag pattern for an 18" doll but hadn't come up with anything that I had pictured in my mind. Then I ran across this full-size purse and just loved it. I knew I had to design a pattern for the 18" crowd.


So I grabbed some paper, pencil, rules, scrap fabric and such and began. I'm pretty satisfied with the results, but I need to "tweek" a few things before I really feel good about the pattern.

Just showing another angle. I think the size is good in proportion to the size of the doll.


I need to widen the tabs that hold the D-rings. I should, also, shorten the length of the tab.
Top stitching should be added for aesthetic reasons I think, especially on the straps. It has good body to stand on its own, and I like the contrasting lining. I think a tab with button closure would be a good detail to add.


One last picture of Sam in her mismatched outfit. . . Tsk, tsk, tsk.
If you have any input or suggestions on these, I'd appreciate your thoughts. Two heads are usually better than one.

Wednesday, September 22, 2010

Recent American Girl Doll Sewing Project

I've been very busy around here lately as testified to by my lack of blogging. Our homeschool program is back in full swing, I've been doing a lot of sewing, and a little bit of designing.
So here's a look at what I've been working on.

Here's Sam sporting a Liberty Jane pattern design of an olive green T-shirt and khaki jeans. The only change I made to the pattern was to make the sleeves 3/4 length (instead of cap sleeves) which is very popular this fall fashion season. The crocheted cap is my own design.

The spaghetti strap top is, also, my own design. I love the layered look, and I think it blends very well with the Liberty Jane Design.


I used the same LJ pattern I mentioned before for the Tee and jeans. I think the Bittersweet orange shirt and copper cap really change the appearance of the entire outfit.


I really was pleased with the handkercheif hemline on the top, which was inspired by a shirt Orangeblossom wore this summer. It looks nice layered or all by itself.

A close up of the shirt's details.

Close up of the jean's. They have actual pockets in front and back, a faux fly, and lots of topstitching.
I'm really looking forward to sewing some more trendy doll clothes to sell. Orangeblossom is loving these, and the pieces mix and match to make lots of great outfits and looks.

Monday, September 6, 2010

Labor for the Day

Since it is Labor Day, I thought I would give you a little work project that yields big results. I discovered this method of propagating plants a few years ago and have had such wonderful success with it that I would like to share it with you. This plum tree was started last winter in my propagation pot and then transplanted into this pot in the spring. You can definitely see that it is thriving. My daughter is about 5 ft. tall, so you can compare the height of the tree to her. The pit was planted just about 9 months ago.


This propagating pot is so easy to assemble. You will need a few supplies to start.

1 large terra cotta pot (the one I use is 12" in diameter & 10" in height)
1 small 4 inch terra cotta pot

Peat Moss & Sand (mixed in a 1:1 ratio)

2 cork stoppers

First, let me say that the pots cannot be plastic, they must be terra cotta for this system to work. The pots must be porous.


Okay, here's how you assemble the propagation pot:
  • Stop up the holes in the bottom of both pots with a cork. Press it in firmly.
  • Mix sand and peat moss together (do not use potting soil or soil of any kind). The mixture ratio is 1 part sand to 1 part peat moss.
  • Fill large pot with the mixture until it is about 5 inches from the top of pot. Press mix down firmly.
  • Set the smaller pot on top of the mixture in the middle of the larger pot.
  • Surround smaller pot with the sand/peat moss mixture. Stop the mixture approximately 1/2" below the top edge of the smaller pot.
  • Completely fill the small pot with water to its top edge. From now on, the only thing you will need to do to maintain the system is EVERYDAY fill the small pot with water to its top edge.
  • Do not start any cuttings in pot until you have been keeping the small pot filled with water daily for 7 days.


Each fall I take 2 or 3 cuttings from each of my geraniums, dip the cuttings in rooting hormone, poke a hole in the sand/peat moss mixture, and place the cutting in it. By spring the plants have a nice healthy root system and are ready to plant outside. In this way, I have doubled or tripled the number of geraniums I had the year before. I am showing you a picture of the rooting hormone that I use on my cuttings. Any brand will be fine for you to use. Just follow the directions on the jar or package.

Geraniums are not the only plant you can propagate in this manner. Many house plants can also be propagated in this way. Have fun and experiment. For instance, the plum tree was not even started as a cutting. I simply put a plum pit from a plum I was eating into the propagation pot to see if it would sprout. And as you can see, it DID sprout (and with a nice healthy root system).
The steady moisture leaking through the sides of the small pot creates an ideal environment in which cuttings and hard-shelled seeds/pits just thrive.

Also, as long as the weather is nice, I leave the pot outside. I take it in the house before the frost comes and keep it inside for the winter months. When it starts warming up outside in the spring, I move it back outdoors again.

Hope you all have fun with your little project. BTW it's a great home education project for the kids as well.

Friday, September 3, 2010

Patience is a Virtue and Carries Much Wait

I have been working on several sewing projects this week. I have been sandwiching all my sewing in between the starting of our home school year. However, this is the only project that has been totally completed this week.

Last summer, I designed the pattern for these drink stick wallets, so that my husband could carry drink sticks to work with him for breaks and lunch. No, his was NOT in this color. His was in a MANLY black plaid. A few people saw his and liked it.

I made one for my sister. A few of her friend and collegues saw it, liked it, and ordered one from me. I made a few more and sold them around town, and it really seemed like they were becoming a hit. So I decided to put a few in my Etsy shop.
But, that's NOT where these two are heading. They are heading somewhere special and I am really excited about it!

This one, on which I appliqued a heart on the inside, is going to a very special someone.
But that is all I am going to tell you. Until the end of the month, it will have to remain a mystery.
ooooooooooooh, I always wanted to write a mystery!!! ;o)
Related Posts with Thumbnails