Bringing Katya Home Blog

Friday, July 31, 2009

Pattern Sale - First Half of August 2009


Here are the sale dates for patterns at JoAnn Fabric Stores for the first half of August 2009. So if you have a sewing project you're thinking about, check out your Local Jo Ann Fabric store for your pattern on the dates listed below.

PLEASE READ THE DATE CAREFULLY.
THE PATTERNS ARE NOT ALL ON SALE THE SAME DAY.


FRIDAY - SUNDAY
August 7 - 9, 2009

McCall's Patterns $1.99 each
(MSRP $5.25 - $16.95 ea.) (Limit of 10) No special orders -- Excludes "Easy Stitch ‘N Save”

&

Vogue Patterns $3.99 each
(MSRP $8.95 - $30.00 ea. (Limit 10) No Special Orders


THURSDAY - SATURDAY

August 13- 15, 2009

Butterick Patterns $1.99 each
(MSRP $6.00 - $16.95 ea.) (Limit of 10) No Special Orders -- Excludes “See & Sew

Wednesday, July 29, 2009

Just a Note

I have now posted Part 2 of Lesson 3 (Sewing the Camisole for 18" Dolls).

Monday, July 27, 2009

You Can Make It -- A Camisole for American Girl Doll

Lesson 3 for the Budding Young Seamstress


INTRODUCTION TO LESSON 3

I was planning a gathered skirt for this lesson until I realized that we have already made two skirts for our doll, but we have not yet made her a top. Since these lessons are geared for youngsters who will want to play with their new creations, I decided that I will postpone that lesson until we have made a pattern for a camisole and sewn it. This will allow us to practice the techniques we have already covered in Lessons I and 2. I will again suggest that Lessons be taught in their numerical order.

Click here to go back to LESSON 1

Click here to go back to LESSON 2

Three new techniques we will learn in this Lesson 3 are

1. applying interfacing

2. sewing a snap fastener

3. using a sewing notch for placement


The first two patterns that we made were rather simple to make. Because this camisole pattern is more involved and will take us a little more time to prepare, I am dividing this lesson into two parts.


Click to continue to PART 1 of LESSON 3 - Preparing the Pattern

Click to continue to PART 2 of LESSON 3 - Sewing the Camisole

Camisole Pattern for American Girl Doll


Lesson 3 - Part 1

Making Pattern for Camisole for American Girl Doll


Refer to the photos. READ ALL DIRECTIONS BEFORE STARTING TO MAKE PATTERN.


SUPPLIES

Three pieces of paper (approximately 8-1/2" X 11")
Pencil
Ruler
Scissors


CAMISOLE FRONT


STEP 1: Draw a 3-3/4" x 5-1/4" rectangle near the center of the paper. (See above photo). You need not mark the measurements as I have. I have marked them merely for your reference.


STEP 2: In the upper left corner of this rectangle, draw a 1/2" x 1-1/2" rectange as shown in the photo above. Mark the lower right corner of the small rectagle with a dot.

STEP 3: Draw a line from the lower left vertex of the large rectangle to the dot you marked on the small rectangle. (as indicated by the red line in the above photo.)


STEP 4: Along the top edge of the large rectangle, measure 1-3/4" from the top right vertex of the large rectangle and mark with a dot.

STEP 5: Time to play connect the dots. Connect the dot you just made in STEP 4 with the dot that you made in STEP 2. The line is indicated by the red line in the photo above.

STEP 6: Make a triangular notch (as indicated by the green triangle in the above photo) along the first red line you drew. The notch should be around an inch below the angle. This does not need to be an exact measurement or size. It will be used to teach a technique for matching seams accurately.


STEP 7: Using the photo above for placement reference, write the following:

"Camisole Front"
"Cut 1"
"All seams 1/4" allowance"
Draw a bracket as shown and the words "Place on Fold"

STEP 8: Cut out pattern.
CAMISOLE BACK


STEP 9: Place cut out pattern "front" in middle of blank sheet of paper.

STEP 10: Trace around top, left, and bottom side of pattern.

STEP 11: Measure 3/4" from right side of pattern and draw line parallel to edge of pattern as shown in photo above.

STEP 12: Set aside "front" pattern piece.


Your paper should now look like the above photo.

STEP 13: Draw a line parallel to the right side and inside the pattern piece. Place arrows at both ends of line. Write "straight of fabric" along the line.

STEP 14: Using the blue pattern piece in the photo below for placement reference, write the following on the pattern:

"camisole back"

"Cut 2"

"all seams - 1/4" allowance"

STEP 15: Cut out the pattern.

FRONT & BACK FACING

STEP 16: Place "front" & "back" camisole patterns on blank sheet of paper as indicated in the above photo.

STEP 17: Trace around both pattern pieces and then remove.


Your paper should now look like the above photo.

STEP 18: Measure 3" from the bottom of patterns and draw lines parallel to bottom edge of pattern as indicated by red line in above photo.

STEP 19: Mark both patterns as shownon the pattern pieces in the photo above.

STEP 20: Cut out pattern.

You should now have four pattern pieces that look like the photo above. They do not need to be different colors. I have made them different colors in an effort to make the instructions more clear. You now have a free pattern for a camisole for an American Girl Doll or other 18" doll.

I will try to post the sewing part of the tutorial (Part 2) before the end of the week. This way you have a couple of days to get your pattern made.

CLICK TO RETURN TO LESSON 3 - INTRODUCTION

CLICK TO GO TO LESSON 3 - PART 2

Sewing Camisole for American Girl Doll


Lesson 3 - Part 2

Cutting Fabric & Sewing Camisole


NOTE TO TEACHER

As you teach your student, continue to remind her of the importance of accurate measurements when pinning a pattern on the straight of the fabric and the importance of cutting accurately, as well as the importance of finishing her seam edges TO PREVENT FRAYING. Remind her to backstitch at the beginning and end of all seams. Refer to Lesson 2 - STEP 4.

Allow the student to take more than one session to sew her project. It doesn't need to be finished in one marathon session. If she becomes frustrated at a certain step, tell her to set it aside, and that you will work on it with her again later. Remember, we are not only teaching her HOW to sew, but also to ENJOY sewing.

Rather than show a technique that we have covered in a past lesson, I will simply refer you back to previous lessons and the STEP # that covers the particular technique.

SUPPLIES

Camisole Pattern made from Lesson 3 - Part 1

Fat-Quarter of lightweight cotton fabric

Thread that matches fabric

Small piece of lightweight, fusible interfacing

24" of 1" wide flat eyelet lace

18" inches of ribbon

(2) Size/No. 1 snaps

Straight pins

Ruler

Scissors

Needle

EXPLANATION OF LACE AND RIBBON


Your student will be cutting two 4" lengths of ribbon for the straps of the camisole. The type and width of the ribbon is a matter of personal preference. The photo above shows some suggestions. Looking at the ribbon from the top right of photo to bottom left, the first ribbon is 3/8" wide (used alone it would be appropriate for a spaghetti strap). Next is a cotton beading eyelet which is approximately 1/2" wide. Next we have a 1/4" wide satin ribbon that would make a thin strap. Last is a 3/4" wide satin ribbon that would make a wide strap. Personally, I would stay in the 3/8" to 3/4" width range. The color of the ribbon could match or contrast with the fabric you have chosen, and you could use grosgrain ribbon, cotton ribbon, or satin. The choice is yours.

The above photo shows the eyelet lace (top of photo) which I have chosen for the hem of my doll's camisole. The ribbon and beading eyelet will be used in combination for the straps.


I simply wove my ribbon through the beading eyelet to prepare it for the straps.


STEP 1: Pin camisole pattern to fabric. Refer to Lesson 1 (STEP 1) for placing pattern on straight of fabric.

STEP 2: Cut out pattern.

INTERFACING

Here your student comes to a new technique. She is going to fuse interfacing to the edge of the back of the camisole. Explain to your student that Interfacing helps to strengthen or reinforce an area that might have extra strain from use of fasteners (such as buttons or snaps, etc.) It also helps to maintain a nice crisp edge when used at a garment's edge.

STEP 3: Cut 2 (3/4" X 5-1/4") strips of interfacing.


STEP 4: Following the manufacturer's instructions, fuse the interfacing to the edge of the camisole back as shown in the above photo.

SEAM ALLOWANCE

All Seam allowances for this project are 1/4" unless stated otherwise.

FACINGS

Explain to your student that a facing is a method used to give a "finished" edge to a garment. There are other methods to finish the edge of a garment, but this method is quite common with the manufacturers of sewing patterns.


STEP 5: Finish the long edge of the front and back facing using one of the following to methods:
METHOD 1: Clean finish raw edge by sewing a zigzag stitch along edge in the same manner used to finish a seam. (Refer to Lesson 2 - STEP 6)
METHOD 2: Draw a line 1/2" from long edge of facing. Fold edge to meet line and press with iron as shown in above photo. Stitch in place with narrow zigzag stitch.

STEP 6: With right sides of fabric facing each other, pin the edges of the camisole and facing as show in the above photo. Stitch seam (as indicated by blue line in above photo) and finish raw seam edges. Refer to Lesson 2 - STEP 6. Repeat for other half of back camisole.


STEP 7: Cut 2 lengths of ribbon for straps. Each shoud be 4" long.

STEP 8: Align edge of ribbon (strap) with top edge of camisole, butt side of ribbon (strap) against seam indicated by blue line in above photo. The (ribbon) strap is sandwiched between the facing and the camisole back. The right side of the ribbon (strap) faces the right side of the camisole back fabric. Stitch across top as indicated by the purple line in the above photo and (as always) finish the raw seam edge.


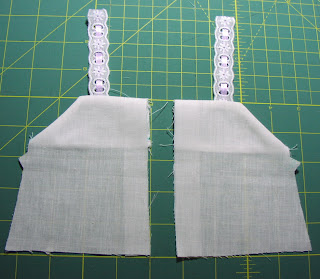
STEP 9: Turn pieces to right side out and press with iron. The student should have two backs of the camisole that look like the above photo.

REPEAT STEPS 6 - 9 FOR FOR CAMISOLE FRONT & FACING.


The student's camisole should now look like the above photo.

STEP 10: Explain to your student that NOTCHES are used by pattern makers for several purposes. One purpose is to indicate edges that go together; a second purpose is to properly align the edges of a garment. With right sides of fabric together, match the notch on the back of camisole with the notch on the front and pin the front and back together at that point. Then match the top edge together and pin at that point. Last, match and pin the bottom of the side edge. Repeat pinning procedure on other side of garment.


STEP 11: Sew both side seams as indicated by blue line in above photo. Finish raw seam edge. Press seams toward back of garment.


STEP 12: Fold remaining ribbon in half and mark center. Stitch securely to cener front of camisole. Tie a bow. Cut ends of ribbon diagonally.


STEP 13: Sew eyelet lace to bottom of camisole to finish hem as we did in Lesson 2 - Steps 15 through 17.

STEP 14: Trim eyelet lace even with back edge of camisole.

STEP 15: Use Method 1 to finish both back edges of camisole. (See STEP 1 above).
Note: You will notice from the photo above that serging edges of the camisole to prevent fraying may be used instead of Method 1.

STEP 16: Fold both interfaced back edges of camisole to inside of garment using the edge of the interfacing as a guide. Press with iron.

STEP 17: SNAP PLACEMENT should be marked 1/4" from top edge on the INSIDE of the camisole as indicated in above photo. Mark a second dot 2" below first dot. Repeat on second side of back on the OUTSIDE of the garment.


NOTE: You may think that a SIZE/NO. 1 snap is too large. I recommend this size for students because the larger size enables young hands to hold them in place more eaisily while sewing them to the garment. It is also easier to see if the students stitches are even and neat. Later when they are more adept at sewing on snaps, they can begin to use smaller sized snaps when appropriate to the garment.

STEP 18: SEWING SNAPS is done in the following manner: place center of snap directly over dot. Using a double strand of thread in needle, sew through hole in snap three times before moving to the next hole. Refer to above photo. After completing all four snap holes, tie a neat knot and cut thread. Repeat with other snaps.

Congratulations! You have now completed a camisole that your 18" doll can wear with the skirts you created in Lessons 1 & 2.

Wednesday, July 22, 2009

Mr. Wolinsky, Thank You From the Bottom of My Heart


I am so excited to share my NEWEST FIND with you today. For about a year now, I have wanted to understand how to create Web pages and use HTML. I have even looked at several books on the subject to try and learn the process, but even the “For Dummies” books left me feeling as though I were going down for the third time, drowning in an sea of information that was “over my head”. What I needed was the B.A.S.I.C.S. – you know, the stuff elementary age kids are learning in school. I had just about given up on the idea, when quite accidentally, I came across this book in the Children’s Section of the library.


Well, I’m not too proud to say that I am only on a kid’s level on this subject. I was ready to give it one more shot – a sort of last-ditch effort. So I took the book home to read it and do the little exercises.

WOOOOOOO -eeeeeeeeeee!!!!!!!!!!!!

PAYDIRT!!!!!!

I understood what the author was saying! I understood how to do it and why! He's not out to impress me with his TECHNO-JARGON; he's out to help me UNDERSTAND and LEARN and DO. I’ll grant you; it is only a spring board for learning more about the subject, but at least I now have HOPE that I CAN learn it.

Here is an exerpt from the books jacket. “In Creating and Publishing Web Pages on the Internet, author Art Wolinsky takes readers on a step-by-step journey through the planning and creation of multiple Web pages. . . The author also provides basic information needed for creating future Web publishing projects!”

It further states that “Art Wolinsky is an experienced teacher who has spent the last fifteen years teaching technology to middle school and high school students.”

Anyway, I thought I'd share the wealth. Perhaps there are others like me out there who would really like to understand HTML a little better, but really needed a foundation on which to build. I’m telling you, “This book has been a great help to me and I think it could help you, too.”

So, Mr. Wolinsky (wherever you are), you have my deepest gratitude!!!


Y You're never too old to learn,

Nanci

Monday, July 20, 2009

A LITTLE MORE PRACTICE

. . .BEFORE THE BIG DAY.


Very soon our firstborn will be taking her driver's test. She has become a safe and accomplished driver, but is still polishing her parallel parking skills. We're blessed to have a driver's course in the next town we are pemitted to use.


It is no small task to park such a long van, but she has no choice. Our only other vehicle is a motorcycle.


Dad "coaches" from the sidelines - Be sure not to touch the cones!!!

That's it . . . straighten the wheels and pull forward


"Not-so-little" brother keeps his fingers crossed as he lounges on the grass and watches her progress. Once she passes her driver's test, he's allowed to get his permit. Believe me that's incentive enough for him to "cheer her on"! ;D


Okay, good job! Now, do it again

and again

and again. . .

Y Blessings,

Nanci

Tuesday, July 14, 2009

The Gardener

I like you to meet our new Gardener.
6

He's a real free thinker . . . whoever would have thought to plant a pumpkin patch right next to the wood pile.

He apparently planted the seed last fall in some straw that was left over from the garden.


If I actually get pumpkins to use to decorate the front of the house this fall, I might forgive him for stealing the seed from our birdfeeders. (I'll have to think about that!)


My friend had grown pumpkins last year, and had given me a couple with which to decorate the outside of our house. After they had served their purpose and had begun to go bad, I told the kids that they could take them out back to use for target practice. Our little friend, the gardener, must have thought the seeds would make a great stash for winter. Trouble is he must be a little absent-minded, because I am constantly finding his little sprouts all around our yard. . . walnut trees, sunflowers, and now. . . pumpkins.

Y Blessings,

Nanci


Thursday, July 9, 2009

Christmas in July

Merry Christmas!


Yes, I DO know it's July. . .

No, I haven't totally lost my mind (only partially, but that happened long ago!)


You might remember this post back in the beginnning of this year. You might recall it involved an unfinished Christmas gift for a special little friend of mine. Yesterday (at last) I finished the matching doll dress. Today, it will be wrapped up in a Festive Mailer like the Christmas gift that it is and mailed off to her. I know she doesn't follow my blog, so I can show you the fruit of my labor.


I had designed this doll dress for her American Girl Doll, Kit, to match the dress that I had made for little Grace at Christmas.

5
A close-up of some of the detail work.
6


Now, I'm off to finish another work in progress. Maybe I'll catch up with everything that needs done before school starts again -- sighhhhhh -- just in time to start falling behind again. I'm sure some of my fellow homeschool moms can understand.

Y Blessings,

Nanci

Monday, July 6, 2009

Model Seeks Retirement & Home Life


You may recognize her from my sidebar. Melanie was the first to model my creations. Next to come live at our house was Molly, who belongs to my daughter, and then last year my three children arranged for Samantha to come and live with me. Perhaps, it was seeing Orangeblossom (my dd) and Molly playing together that first sparked Melanie's desire for more than a modeling career. She has grown tired of the glamorous world of modeling, and has expressed her desires to me that she would like to be a REGULAR little doll and have a little girl "mommy" who would love her and play with her. "After all," she told me, "Samantha loves pretty clothes, so you would STILL have someone to model for you."

So my search began to find a "special little mommy" for Melanie. I was so pleased when I heard that a dear little girl at our church was looking for just such a little dolly to love and play with. She is such a sweet little girl that I knew that she and Melanie would be very happy together.

Melanie wanted to make a good first impression. But, alas, while she had modeled many pretty clothes, she had none of her own. It just would not do for her to show up in her "birthday suit". It was decided that before she would meet her new "mommy", she would definitely need a new outfit. It must be something that would look very "special" to a little girl. And so after much discussion, it was decided that the elements of that outfit would have to include the color PINK, some LACE (Melanie is partial to eyelet lace), a nice full "twirly" kind of skirt with a net underskirt to make it "poof out", and pantalettes to finish off the look.


And that is how it came to be that we created this dress which Melanie wore when she met her precious little girl "mommy". And it was well worth the thought and effort to prepare for their first meeting. Melanie's new mommy is a reserved little girl, a tiny little peanut with beautiful, big, doe-like eyes. She quietly murmured "thank you". I could tell that I had made the right choice for Melanie's "mommy". I was certain that she loved Melanie, because she carried her everywhere and would not let go of her.


So, I thank you, Melanie Springfield, for you have been a very helpful model for me over the past couple years.

And I thank you little Miss who has taken Melanie home to live with you. I hope that you share lots of secrets and giggles, because that is the way of little girls and their dollies.


Orangeblossom snapped this last picture of Melanie and her new "mommy." I think I've arranged a VERY GOOD match!!!

6


Y Blessings,

Nanci

Saturday, July 4, 2009

A Tale of Yesterday. . . and Today - Part 3

I am now at the climax of my story. Could I be going to tell you that. . .

I lost so much weight, having become a mere shadow of my former self, that I can now fit into the pattern, and that at long last I am going to make it for myself. (Oh I wish, but FAT CHANCE. I’m writing a memoir here, not a fantasy!!!)


Okay, on to the actual account. I pick up at our thought from last post.

That is until several weeks ago when my youngest daughter, Orangeblossom, had been rummaging around in my bedroom and found my old treasure for herself. The scene from forty-five years ago again began to unfold. Only this time there was a twist in the plot, this mama loves to sew, and she would love to sew THIS pattern. When Orangeblossom came running excitedly up to me and, in that same pleading voice that I had used so many years ago with my own mother, asked me to make the pattern into a dress for her, I melted. I steadied myself before answering and said, “Let’s check your measurements first to see if the pattern will actually fit you.” And it did fit!!!


“We need to see if all the pattern pieces are here. You know, Honey, it’s a very old pattern, there might be some missing,” I added hesitantly, fearful of getting up her hopes, as well as MINE. Strange as it might seem, I had never thought to look at the actual pattern before; I had never taken out the contents of the envelope to check them. In that torn and tattered envelope, somehow the pieces of the pattern were still in good condition. In fact, they were in VERY good condition. BUT were they all there; had some been lost? We counted and compared. YES, ALL THE PIECES WERE THERE!!!

I’m not sure who was more excited, my own little girl or the little girl from long ago that still resides somewhere deep inside me. Now I needed to know when exactly this pattern was published, because that would determine the fabric that we would choose. I wanted this dress to be as authentic to the time period as we would make it. I emailed Simplicity giving the number of the pattern in question and added that it was priced at 25¢ on the pattern. I was astonished to get a reply that very afternoon. While they did not still have the actual pattern to check, the price of the pattern was helpful in determining that the approximate date of the pattern was around 1940 – maybe a little earlier.

Armed with that information, we could now go and select fabric. The fabric had to be just the right design. With all the retro fabric that is manufactured now days, I was certain that we could find just the right fabric for the style. After much searching and deliberation, Orangeblossom finally decided upon a simple cotton fabric with only four colors in the palette. The design was rosebuds on a light blue background. Now all that was left was to take it home and begin.

I was especially excited about making this dress for several reasons.

Out of the four vintage patterns, my own daughter had fallen in love with the very same pattern that I had so long ago.

My mom had worn a dress like this, and now my daughter would.
I was actually making a garment from a vintage pattern, something I have wanted to do for such a long, long time.


It was such fun to see some of the differences in this pattern and the patterns that are produced today. For example, the darts were marked only by perforations where they started, ended and changed width (think of paper punch holes). Actually, I liked this method much better. I used a water-soluble marking pen that made the whole process quick, easy, and accurate. In the day when the pattern had been made, it would have been a little more difficult. Seamstresses in that day would have to make “tailor tacks” for the markings. Another thing that made me chuckle was that zippers were called “slide fasteners.” The directions were a “little sketchy”, but I had enough knowledge of garment construction to keep myself out of trouble.

I’m always pretty particular about my sewing projects, but I have to admit I might have gone a little overboard on this one. I wanted it to be “just right”. I really took my time sewing. I even did some hand basting (something that nearly never happens), and I probably re-sewed a few things that would have been fine. But in the end, Orangeblossom and I were BOTH pleased.


The only thing left was the photo-shoot. So here are the results. . .


Y And that's the end of my tale,

Nanci

Related Posts with Thumbnails