Bringing Katya Home Blog

Tuesday, June 30, 2009

A Tale of Yesterday. . . and Today - Part 2

Ah, but the second wooden trunk was much different in my young opinion. It was INDEED a treasure chest. I often wondered why we kept such marvelous items stored away in an old chest in the attic. They should be displayed in the main part of the house (or better yet, we should play with them.) For instance there were two marvelous clown suits that my grandma had sewn – Lemon Yellow and Fire-engine Red – and big flounces with rickrack trim for the collar and yarn pompoms down the front. I was so disappointed upon trying them on, to find they were MUCH too big for me to wear. Grandma must have made them for “big people”. Sigh. However, there were other things to grab my attention -- lovely, Victorian postcards and old sepia-tone pictures of people I had only heard about – stern-looking women with fancy hats and gentlemen standing straight as a poker. Oh, and there was more…so much more…letters and cards and old books. Each time I looked through that old chest, I seemed to find a new treasure.

Oh yes, that brings me back to the day I first found it. It was not the only one I discovered in that chest; actually there were three more. But as I looked at them, it was the one particular sewing pattern that grabbed my eye and took my fancy. I'm not sure why I liked it. I mean it really wasn't the frilly kind of dress a little girl would like. In fact it was rather plain, but the way bodice seemed to drape around the shoulders until it reached the waist somehow fascinated me. OR maybe it was because I realized that it was OLD, and I have always had a tender-spot for old things (even as a child).


I hurriedly put everything back into the trunk, gathered up the four old tattered treasures into my arms and rushed back down the stairs as quickly as my fear of those steep old stairs would allow me to go. You see, I had been learning to sew for a while now, and surely my mother would allow me to make THIS dress. She just had to!!! “Mommy, Mommy,” I called as I raced around the house in search of her. “Look what I just found. Isn’t it beautiful? Can I make it? Pleeeeeeease!”, the words and exuberance tumbled from my lips.

But my mother got that tired look on her face that her overly active, imaginative, and curious little girl sometimes put there. “Oh, Nanci, you’ve been rootin’ in the attic again. Haven’t you? You didn’t make a mess up there, did you?” Her thoughts seemed to drift away.

The mother in me now realizes that she was probably anticipating the mess that would greet her at spring cleaning time. Each spring she would trudge up two flights of stairs with a bucket of bleach water, scrub brush, and cloths to scrub the floor and wipe down the dingy walls of a part of the house that no one other than our family ever saw. In retrospect, I believe each year she would have to rearrange the boxes into which I had delved, the very same boxes that she had neatly packed and stacked the year before. She would have to tidy up the attic before she could even begin to scrub. At the time, I really didn’t think that I had made a mess at all. Even if I had, I wondered why mom even cared about it. Why clean what no one ever saw?

Mommy shook herself from her musings, held out her hand, and sighed, “Here, let me see what you have there. Oh, Honey! These patterns would be much too difficult for you to sew. You’re not ready to sew something this complicated yet.”

“You could make it for me!” I reasoned. However, I knew even before the words were out of my mouth that my argument was futile. Unlike my seamstress grandmother, who had died long before my mother married my daddy, my mother really didn’t like to sew. Daddy said that it made her nervous and agitated.

“Nanci, the style is too old for you. This pattern was used to make a dress for me many years ago. Maybe when you’re older, you can make it.” And that was the end of that. :( By the time I had enough sewing experience to make the dress for myself, the pattern was much too small for me. My mother had been a slender woman; I was a little more substantial -- like my father. But I never could bring myself to get rid of that pattern or even the other three, for that matter. They moved with me to my first home when I married my husband, and again followed me to this house fourteen years later and took up residence in my bedroom for the last six years. That is until several weeks ago. . .

A Tale of Yesterday. . . and Today - Part 1

It seems amazing to me that it had been nearly forty-five years since I first laid eyes upon it in the big wooden chest in the attic of my childhood home. The attic was always one of my favorite places to explore. That seems queer to me now, because as a young girl, although I loved to sneak off up there, it was always a place that made me just a little uncomfortable, just a little nervous. First of all, it was not a pretty finished attic. No, it was an OLD attic in an OLD home. The walls had been plastered and white-washed at one time long ago, but by the time I was nearly ten years old and had begun to venture up there, the walls were cracked and grey. The unpainted wooden steps that led up to the third-floor were steep and narrow. I don’t recall that I ever minded climbing up them, but coming back down was quite another story. I never descended those stairs without thinking I was surely going to slip and fall and be found at the bottom as a limp little body. (I was nothing, if not imaginative as a youngster.)

Perhaps, it was my vivid imagination that caused me to be a little nervous when I was in the attic. The slightest sound would cause me to shoot a quick, furtive glance over my shoulder toward the teeny-tiny doors on the opposite walls. I was certain that one day I would see someone. . .or something. . . opening those doors and come creeping into my world from some unknown world beyond. I had never seen behind those little doors. My mother always told me that they were “just the doors to the cubbyholes” and that I didn’t need to get in those. She needn’t to have worried about that, I was never going to open one of those doors. Who knew what might come scrambling out at me. You know they were just the right size to be the door for a gremlin or a goblin or worse.

Despite my trepidation, the attic still called to me and my sense of adventure. There were too many wonderful old things in that attic – a carved, wooden bedstead that was taller than I was (nearly five-feet tall) with an old washstand to match, an old pianonette, curtain stretchers, and two grand wooden trunks. The one old chest held an old china baby doll whose hair was tangled and whose face was soiled and lined with hundreds of fine cracks. Although her dress was pretty and frilly, it too was slightly soiled from years of being tucked away in that old chest. And although my mother said that it was her favorite baby doll when she was little, that dolly always frightened me for some reason. I often wondered how someone could love such a baby doll as that. So that trunk (with the baby doll that stared up at me when I opened the lid) was safe from my prying eyes and fingers. I suppose my mother was glad that at least one of the trunks would not be disturbed by her curious little girl.

Ah, but the second wooden trunk, the one where I had found "it", was much different in my young opinion. It was indeed a treasure chest . . .

Thursday, June 25, 2009

You Asked For It

I have been asked a few questions in the comment sections of some of my posts. I thought that I would answer them here in one spot. The questions are on different subjects, so I'll repeat the question asked and then follow it with my answer.


QUESTION #1:


"How EVER did you find those finger pointer things?" (I use the picture above to illustrate what we are talking about. But I warn you that in this particular pic, the pointer is not there for any other reason than to display the graphic about which we are speaking -- or should I say writing?)


ANSWER:

I found the pointer in Picasa. Here's how to put pointers into your photo. Open the text box to add text to a photo. Choose "Wingding" as the font. The pointer can be displayed by typing "e" using the shift key. You can then size and position or rotate it in the same way you do the normal text box.


QUESTION #2

"Now. A question. I've noticed that lots of patterns are similar with slight variations. What do you feel are the most crucial patterns? The ones that you could easily tweak in one or two areas? or do you just buy new patterns for the variations? I ask because, I've noticed myself purchasing dress patterns for myself that are suprisingly similar with just slight variations and I wonder if it is worth it. Right now, obviously being a new seamstress, it is. But will it ALWAYS be? Just curious."


ANSWER:


This question is a little tougher than the first one, because my idea of "crucial" may be very different than someone else's. For this reason, I would appreciate anyone with sewing experience to add your answer to mine by leaving a comment.

Now to my convoluted answer. This is how I would go about trying to determine a crucial pattern for myself. I would think of a dress, shirt, etc. that I thought was becoming on me (this of course will be different for each of us, since God has made us with a great variety of body types). I might think about what garment in my closet gets worn the most. If I couldn't think of any in particular, I might go to a store and try on some outfits (even expensive ones) until I found something that was a "good" style for me. (After all, it costs nothing to try things on, and I am only trying to determine what style looks good on me. I don't have to buy it!) If I were a beginning sewists, I would look for something that is rather simple, yet attractive.


Next, I'd go to the pattern books and look for something similar to "my" chosen style. Again, if I were a beginning sewists I would check to see if this pattern would be simple to sew. I often will take the instruction sheet from the envelope to look it over BEFORE I purchase the pattern. If I don't like what I see, I simply refold it neatly, return it to the envelope, and then put the pattern back in the drawer.

I rarely buy a different pattern for all the variations -- in fact I rarely make a pattern up exactly the same as it is meant to be. Although, I must admit this ends up adding time to my making things -- the time it takes me to revamp the sleeve or add some detail or other.

As to "will it always be so"? That is really up to YOU! Don't be afraid to risk making slight changes even now. Children's outfits are a great place to practice. (Less wasted material if something should REALLY go awry. Also, a child's body shape is less curvy, so usually there is less chance of making a major mistake in fitting.) The more we sew patterns and become familiar with what we are doing--the less complicated these changes become. We can sometimes combine the sleeves of one pattern with the bodice of another, and thereby get the exact look we want.


Here, I am going to suggest a book I came across a year or so ago. The title is Make You Own Patterns by Adele Margolis. I absolutely LOVE this book, and would recommend that you find this book and make it your own. The illustrations are great, she explains the how-to's of tweaking your patterns.


QUESTION #3

"On the subject of busts, . . . are there any particular style necklines or shirts that are more flattering for (larger) busts, I wonder? "


ANSWER

Yes, there are some ways to minimize the appearance of a larger bust. The first tip is to separate the visual plane of the bust. For instance, a wrapdress or shirt (the kind that crosses over in the front of the chest) would accomplish this.


  • A V-neck, even a plunging V-neck with a tank top underneath for modesty will still separate the bustline and thus make it look smaller. A square neckline will (surprisingly to me), also, minimizes the apprearance of the bust. Scoop necks are another good choice.

  • Stay away from high or round necks, as they accentuate the size of the bust. Boat necks, turtlenecks, and sweetheart necklines are also a no-no. Lower necklines are better. In colder weather a light-weight scarf can be used around the neck and tucked into the bodice (think of Pride & Prejudice). If you do wear a high neckline, put a long rectangular scarf around your neck and knot it just below your bustline.

  • Empire (raised) waistlines will also help to minimize the appearance of a larger bust.; however, the less gathers under the bustline the better.

  • Vertically striped tops and dark colors or dark background prints are another good trick. Stay away from shiny, metallic, or clingy fabrics that draw attention to the bust.

  • What about sleeves or lack thereof? Spaghetti straps, sleevelesss and short sleeve styles will draw the eyes to the bustline and are less desirable than long sleeves. Ideal are 3/4 length sleeves.

  • Single-breasted coats are preferable to double breasted.

  • Stay away from large collars, ruffles, or frills at the neck or bust. These add visual bulk to the area.

  • Baggy clothes also create a visual mass that accentuate the size of the bust. Clingy or form fitting tops draw the eye to the bust as well. Tops that fit well but are not TOO form-fitting are flattering.

  • Carrying a large handbag will also draw attention away from the bust.

Here are a few sketches that I belive might fit the above criteria. I will refer to the view I think falls into the category we are talking about. But remember that they are NOT especially sized for a generous bust, I'm just trying to show you some pictures as examples of styles that would be flattering on a larger busted woman.span>


Top - View B

This top would be a good style (make it with 3/4 length sleeves -- even better)

Jacket/Coat - View D, E

This Top - View C - would be a good style (make it with 3/4 length sleeves -- even better)

Dress - View B (Seems to me to be an excellent style - Might consider this one for myself, just add a straight insert at the neck for modesty's sake.)


Okay, that should give you a little idea of what to look for.


Y I hope this is helpful,

Nanci

Wednesday, June 24, 2009

Pattern Sale - July 2009

Patterns are not on sale everyday, but for a few days each month JoAnn usually has certain manufacturer's sewing patterns on sale. Buy your patterns when they are on sale, and you save a bundle.

We have really hit the jackpot for July. Simplicity, Butterick, McCalls, and Vogue are ALL on sale this month.
PLEASE READ THE DATE CAREFULLY.
THE PATTERNS ARE NOT ALL ON SALE THE SAME DAY.


If there's a JoAnn Fabric Store near you, the pattern sale dates for JULY are:

THURS. - SUN.
JULY 2 - 5, 2009

McCall's Patterns 99¢ each
(MSRP $5.25 - $16.95 ea.)(Limit of 10)
No special orders -- Excludes "Easy Stitch ‘N Save”"

&

Vogue Patterns $3.99 each
(MSRP $8.95 - $30.00 ea. (Limit 10)
No Special Orders


* * * * * * *

THURS. - SAT.
JULY 9 - 11, 2009

Butterick Patterns $1.99 each
(MSRP $6.00 - $16.95 ea.) (Limit of 10)
No Special Orders -- Excludes “See & Sew


* * * * * * *

THURS. - SAT.
JULY 16 - 18, 2009

Simplicity Patterns - $1.99 each
(MSRP $6.95 - $17.95 ea.) (Limit of 10)
No Special Orders -- Excludes "It's So Easy", New Look, Burda & Simplicity Books


Y Blessings,

Nanci

Monday, June 22, 2009

You Can Make It -- A Twirly Skirt for American Girl Doll

Lesson 2 for the Budding Young Seamstress

I am presenting some incremental sewing lessons geared toward youngsters who would like to learn to sew. I hope to build an enthusiasm for sewing by offering projects that are of interest to the younger set, are simple in their construction, and can be quickly completed. It is my aim to introduce the most simple of skills and gradually add more and more difficult skills and techniques as the lessons go along. In our first lesson we learned to cut out a pattern, sew a straight seam, make a casing for elastic, and machine stitch a straignt hem. In today's lesson, we will be building on our first lesson and adding 2 new skills -- zigzagging to finish a seam and sewing a curved seam.

While this tutorial is aimed at the young person beginning to sew under the supervision of her mother or an instructor, it can also serve as a starting place for the older person wishing to teach themselves the basics of sewing. Those who are older when they learn to sew often become discouraged by the appearance of their project, and they often quit trying to learn to sew, saying that they will never be ABLE to learn to sew WELL. I believe that this discouragement stems from trying to sew too complicated or difficult of a project before they have learned the basics.


NOTE TO THE MOM TEACHING HER YOUNGSTER TO SEW

I suggest that you read the ENTIRE tutorial BEFORE starting your project. I will stress throughout these lessons the importance of certain steps. When I do so, please stress them to your young student as well. These are steps that beginning sewists generally think are optional or unimportant; however, they are the steps that make a finished product look polished and well-made. If your student learns to incorporate these skills into her early projects, they will be skills that will stay with her and aid her in becoming an accomplished seamstress. You should teach the lessons in their numerical order. If your student has not done Lesson 1, I strongly suggest that they do so before beginning this lesson.

Picture of our Finished Project 6


SUPPLIES YOU WILL NEED FOR THIS PROJECT

tissue paper or a piece of paper or newsprint to use to make a pattern
light weight cotton fabric
11" piece of 1/2" elastic
a piece of 1" wide eyelet lace at least 36" long
scissors or rotary cutter
bodkin or safety pin
thread to match fabric
ruler
iron
sewing machine
sewing pins


PREPARATION OF PATTERN
Mom, before you start, you will need to prepare the pattern OR walk your daughter through the process. Begin by cutting a 13-1/2" x 1-3/4" rectangle and a 4" x 6-1/2" from a piece of tissue paper, paper, or newsprint. Mark a line for placing it on the straight of the material by drawing a line down the center (measure an equal distance from the long side of the paper rectangle). See photo below. Draw arrow heads at the ends of the line, and write the words "straight of the material" along that line. On the 13-1/2" x 1-3/4" rectangle also write the words "cut 1".
By marking the pattern piece in such a manner, you are beginning to acquaint your student with certain terms and markings that she will see later on professional patterns.


On the 4" x 6-1/2" rectangle, measure 1" in from both long sides at the very top of the rectangle and mark with a small pencil line. Now using the ruler draw a line from the 1" inch mark to the corner as indicated by the hand in the photo below. Do the same on the other side, drawing a line from the 1" mark to the corner below (not shown). The left and right sides of the pattern will look the same.


Now cut along the lines you just drew. You will now have a pattern piece that is wedge-shaped and looks similar to the photo below. Now write "cut 8" on the wedge-shaped piece as shown. At this point your pattern pieces are complete, and . . .THERE. . .YOU HAVE NOW MADE A FREE TWIRLY SKIRT PATTERN FOR YOUR AMERICAN GIRL DOLL. Simple, right?

CUTTING OUT THE PATTERN


STEP 1: Fold the fabric in half, aligning the SELVAGE. The SELVAGE is the the narrow, finished border along both lengthwise sides of the fabric as it come off the bolt. (Explain this term to your student, allowing her to examine the fabric for herself.)

STEP 2: Place the wedge-shaped pattern piece on the material. Be certain that it is on the straight of the material, by making sure that it is an equal distance from the selvage of the fabric to the arrowed line. Here you will explain that this is a very important step, because this is what makes our finished garment hang correctly. When a pattern piece is placed in this manner it is said to be "on the straight of the fabric". Being careful, not to move the pattern piece, place a pin in both ends of the arrow. This will anchor your pattern on the straight of the material. Now, pin each side of the pattern piece. You will need to cut 8 wedge-shaped pieces for the skirt body and 1 of the other pattern piece for the waistband.

STEP 3: Cut around all pattern pieces. Explain to your student that it is very importaint to cut nice straight lines (not jagged). Precise cutting makes it easier to match pieces together for sewing.

TIME TO SEW


STEP 4: Place 2 wedge-shaped pieces together (right sides facing) and pin along the right hand long seam. (The narrow part of the wedge is the top of the skirt -- the wide part is the bottom of the skirt). Sew 1/4" from the edge from top to bottom. (On this project all seams will be stitched with a 1/4" seam allowance. Back stitch at the beginning and end of each seam. This is done by stitching 2 or 3 stitches forward, then reversing and stitching 2or 3 stitches backward. Once again instruct your student in the importance of being precise by encouraging her to try to stitch a nice straight even line. Also explain the term "seam allowance" which is the measure between the stitching line and the edge of the seam.

STEP 5: Continue to add wedge-shaped pieces of fabric to the right-hand side of already assembled pieces. Pin the edge, backstitch, and sew with a 1/4" seam allowance. The picture below STEP 6 shows how it will look as you continue to add pieces. When you have sewn together all 8 pieces, proceed to STEP 6.

STEP 6: SEAM FINISHING This is a very important step which I strongly suggest that you DO NOT SKIP! This step prevents excessive fraying of the fabric when it is placed in the washer. To finish the seam, simply set you machine to zigzag stitch and do a zigzag line of stitch between the seam line and the edge of the fabric as shown in the photo below.


STEP 7: PRESSING SEAMS - I can not possible overemphasize the importance of carefully pressing all seams after they have been sewn and finished. Pressing the seam flat prepares it to be SMOOTHLY sewn to the next part of the garment , etc. In a later lesson we will explain different seam construction methods, but for the ease of our inexperienced students and because of our narrow seam allowances of 1/4", we have chosen this method of seam construction and pressing for this project. Place the body of the skirt with the right side of skirt facing down on the ironing board. As shown in the photo below press each seam (one at a time) toward the right.


STEP 8: Fold wrong sides of the waist band rectangle together and press flat. See photo below.


STEP 9: Place the waistband on top of the skirt body. Carefully pin the waistband to the right side of the skirt material (see the picture below), matching raw edges. (You may possibly have a little extra waistband left over. If you do, don't worry. We will handle that shortly, if needed.)

STEP 10: Sew waistband using 1/4" seam allowance.


STEP 11: Press waistband upward.


STEP 12: After the waistbandI has been pressed upward, if your it extends beyond the edge of the skirt body, cut it off even with the skirt.

STEP 13: Attach a bodkin or safety pin to one end of the elastic and thread the elastic through the waistband casing. STEP 14: Stitch and backstitch each end of the waistband casing 1/4" from the edge to anchor the elastic. Be certain that you are stitching through BOTH the elastic and the fabric.


STEP:15 Pin the eyelet lace to the right side of the fabric at the bottom of the skirt. If you have been going through these lessons, this will be your student's first attempt at stitching a curved seam. This is a gentle curve, and there should be little difficulty if the machine is run slowly. Look directly at where the needle is, that will help you keep the proper seam allowance. Practice will bring improvement, so don't allow your student to become discouraged if her stitching is not as smoothly curved as she would like.


STEP 16: YOU'RE ALMOST FINISHED!!! Press the lace away from the skirt body in the same manner you pressed the waistband in STEP 11.

STEP 17: Fold the skirt in half, carefully aligning the raw edges and pin.


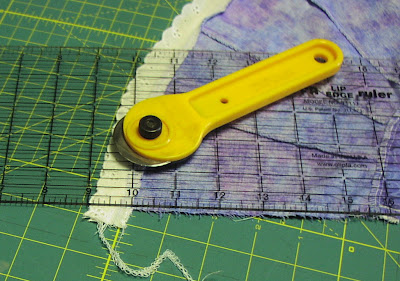
STEP 18: Cut away the extra lace, to be even with the edge of the skirt. Aligning a ruler with the raw edge of the material, will show you the correct angle of the cut to be made. (See photo below.)

STEP 19: Use a 1/4" seam allowance to sew the seam that you pinned in STEP 17. Finish this seam as in STEP 6 and press as in STEP 7.


BELOW SAMANTHA MODELS THE FINISHED PROJECT!


If you would like to make a matching twirly skirt, for your little girl, visit Renaissance Pillowcase Skirt Tutorial for the HOW TO. Seeing the beautiful little twirly skirts Rebecca made her Little Miss inspired me to develop this pattern for 18" doll.

Y Blessings,


Nanci

Friday, June 19, 2009

Sewing Patterns for Varied Bust Sizes


I'm sorry that it has taken me a little time to do my homework for this post. However, as I promised last month when I posted a pic of a blouse my daughter had made for her spring concert, I have some information to share on patterns made with the larger busted woman in mind. These patterns have pieces for B, C, & D cup sizes.


Here's how this will work. By clicking on the Pattern number you will be able to see a picture of the pattern. (That is if all goes as planned. :D)


Simplicity Pattern 2758 - Blouse & Skirt


Simplicity Pattern 3827 - 1 or 2 piece Dress


I hope this will be a help for all those who have difficulty finding a pattern that fits their bust size.


So far, I have only scouted out Simplicity patterns. Please leave a comment if you have found this information helpful. The response I get will determine whether I try to check out more pattern companies when I get the chance and post my findings.


Remember, you can save a bundle on patterns by shopping for them on JoAnn Fabric's Sale Days for Patterns.


I've been trying to post the sale dates here each month.


Y Blessings,


Nanci

Wednesday, June 17, 2009

You may think that this is a mild-mannered bird feeder,


BUT upon closer examination you would realize that all is not as it appears.

In reality, it is . . .


Super-trap,


a true peril for unsuspecting chipmunks.

This little guy squeezed through the feeding hole and was unable to get back out because of the way each hole is hooded on the inside to keep seed from spilling out. The COST of a meal is HIGH these days!!!!


Y Be Careful Where You Dine,

Nanci

Monday, June 15, 2009

PREP WORK

Saturday morning we rose early and began preparing for M**'s Graduation Party. It was just family, with each family bringing a side dish to share. Before Saturday, I had already bought a few decorations to make the event a little "festive"and had prepared all the food. (I had made Southwest Dip and Bacon-Onion Dip for the chips, pickeled beets and eggs, made my favorite cauliflower salad --yummmm--and pineapple and cream cheese lime jello salad, and cooked up the sloppy joes. My dear son had neatly cut all the grass and had done the trimming.


Everything was going along smoothly. I had left only one errand that had to be done that morning; I had to make a trip to town to pick up a few helium balloons for the table decorations. I had waited because I wanted the balloons to be fresh; nothing worse than deflated helium balloons. When I got back we set them on the tables, and things were starting to look nice. Then unexpectedly we hear a shot. My first thought was, "Whose shooting so close to the house". Almost simultaneous with that thought was my cry, "Oh no! get the balloons out of the sun"! Before we could rescue them, we heard another loud pop, and a second balloon bit the dust!


The remaining balloons found a new home on the food table. Orangeblossom was a great help. She loves to decorate.


I spent a good part of last week preparing a slide show of picture I had taken of our "little girl" over the years. (There were over 300 pics, many of them taken with other family members). We set up the laptop and kept the slide show going during the party. I was really surprised at what a "hit" this was; it set everyone to reminiscing and laughing.


I love DQ ice cream cakes -- but they're kinda pricey (okay, okay, they're a LOT pricey and they just weren't in the budget!) So I decided to make my own, complete with crumbly chocolate filling. I know they aren't decorated very well, but it got the point across. It's been years since I've decorated cakes. I decided to go with decorating icing in a tube for sake of ease. Big mistake! The consistency is all wrong, making decorating difficult. I may hate the greasy icing mess, but next time I'll make my own icing. It just works much better. Everyone thought that they tasted great!


TIME TO CELEBRATE!!!

We set up some scrapbooks with highlights from our graduate's homeschool achievements!

Looking over the memorabilia


Time to eat


Newest "addition" got lots of attention.


Y Blessings,

Nanci

Wednesday, June 10, 2009

Sale on Simplicity Patterns at JoAnn Fabrics

Patterns are not on sale everyday, but for a few days each month JoAnn usually has certain manufacturer's sewing patterns on sale. Buy your patterns when they are on sale and you save a bundle.


I told you I would try to keep you updated on the days sewing patterns were on sale each moth at JoAnn Fabric Stores, so here are the sale dates for June. It seems that only Simplicity patterns are on sale this month.


If there's a JoAnn Fabric near you, the pattern sale dates this month are:


Sun. - Sat., June 14 - 20, 2009

Simplicity Patterns - $1.99

(MSRP $6.95 - $17.95 ea.)

(Limit of 10)

No special orders
Excludes "It's So Easy", New Look, Burda & Simplicity Books


Y Blessings,

Nanci

Saturday, June 6, 2009

The Balm of Friendship

As I look back over this past week, I realize we (my family), have many gifts for which to be thankful. Our graduate has been blessed with a good job for the summer, our school year has come to a successful end (despite the many unforseen circumstances that threatened it), I have had the time this week to work on the many household tasks that have been left undone during the school year, and there's been time to rest and recuperate. But more than anything else I am grateful for good family and friendships that support our family and encourage us.


The beginning of the week brought us together for a great day with a family that is just such a support and encouragement to us. A family that we treasure and who we always walk away uplifted after our time together.


Of course, our time together always includes food!


The kids played volleyballl a great part of the day. With their ll kids and our 3, there was no shortage of players. G**** and EVEN I played and I haven't played in several years. I felt GREAT while I was playing. (Competition is good for stirring the blood and forgetting your age). At the end of 4 games, though, I thought it best I quit while I was still uninjured and in the hope that tomorrow I would not be so sore that I would be unable to move. SURPISINGLY, I was fine the next day.


G**** and I decided that maybe a stroll would provide a nice calm activity.

I am truly thankful for the friendship between our children.


The younger boys had a great time playing in the sand & on the playground.


Time for a break. . .


Related Posts with Thumbnails