
Mid – August, si-i-i-i-i-i-i-gh! I always get a little reflective around this time of the year. It’s usually about now that I begin to have thoughts like this…”once again summer has slipped by too quickly”, “I planned on getting this and this and this done”, “I really need to get the school area back in order”, and my thoughts go on and on.
Our summers are a little less scheduled and a little more laid back. Along a more selfish-line, there’s a little more “me” time, chances for me to delve in and create. It seems I never seem to complete all the things I planned to get done over the summer.
You see, we’re a homeschooling family. We have been for the last eight years. This year I seem to be a little more reflective than in other years. This is my older daughter’s senior year. I’m in shock – how did we get here? I remember when we first started homeschooling with a fourth-grader, a second-grader, and an early kindergartener. It was a rough year, I was ready to throw-in-the-towel more than once. I cried, and prayed, and asked God, “How am I going to do this?” Somehow God kept before me my conviction that this was best for our children. My sweet husband was a constant encouragement.
My older daughter was easy. We’d go over a lesson; I would give her the practice work for that lesson or a reading assignment to complete, and she’d DO IT while I worked with her brother or sister. She was conscientious and would often go on to work on something else when she was done with the given task.
My son, the second-grader, was a different story. We’d go over a lesson. I would give him the practice work for that lesson or a reading assignment to complete, and while I worked with one of his sister’s he would DAYDREAM. I would return to him only to find the work undone. I can't begin to count the many evening’s after supper that this little guy and I would have do the work that he was to have done during the day!
The youngest was an eager learner. She often parroted things she heard me teaching the older ones.
The two older children had attended a Christian school until that time. They already knew how to read. In fact, my older daughter loved to read. The year before we began homeschooling, she had received an award for reading the most books in the school that she attended. While my son really didn’t like to read books, still his reading comprehension was good.
My big worry that year was “Will I be able to teach my youngest child to read?” (I believe this is a very common concern with new homeschool moms.) Well, of course, she DID learn to read, and she is also an AVID reader. Ever notice how most of the things we worry about never come to pass?
So here we are eight-years later with two in their highschool years and one in her junior highschool years. I now pray “Lord, I can do this as long as you want, but only with your help. You have never failed me.” I want to encourage any of you who have started homeschooling, stay with it.
The first couple of years are the hardest, then you begin to “settle in”. Somehow, it becomes more natural, a way of life. The rewards are great. A strong bond develops as you all learn “together”. From what I have seen, most homeschool families are very close. The kids don’t seem to think that their parents are from outerspace. They actually enjoy being around their parents. Are there exceptions to this? I’m sure there are, but this has been my general observation.
If you have been homeschooling for a while and have any encouragement or tips for those thinking about homeschooling or in the early years of homeschooling, be sure to leave a comment with your tip or word of encouragement.
Monday, August 18, 2008
Friday, August 15, 2008
Sew Crafty Friday - Matching Little Girl & AG Doll Dress
Before I share a recent sewing project with you, I want to apologize to anyone who tried last week to visit our Sew Crafty Friday page from the link on Shereen's blog and found themselves on the wrong page here at Brambleberry Cottage. I set the link just to come to my blog and not to a particular page. The good thing is that I have learned from my mistake .
...And now on to our project...
The project I have been working on this week is very "hush - hush" (A gift to be given) and so I certainly could not display it here for prying eyes to see. LOL So instead I will share a project I did earlier this year ... a dress for a dear little friend and her AG doll.
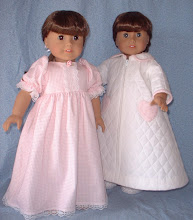
 This is a photo I took of the dress (modeled by my dd2's doll) before I sent it to Grace for her birthday.
Children's apparel is my favorite item to sew. I love all the special touches that can be added -- embroidery, tucking, piping and the like.I used Vogue Pattern #V7958 for a matching little girl's dress. I did change the collar to a peter pan style collar rather than use the collar that was used on the original pattern. I can never leave patterns well enough alone. LOL
The AG Doll dress was not actually a particular pattern. I designed it to match Grace's dress.
SEWING TUTORIAL AND TIPS
Making a pattern more "User Friendly"
 You might remember these bonnets from last week's post. I'd like to use them as an example of making a pattern more user friendly (and time saving).
 For the little girl bonnets I had used Simplicity Pattern #5042. The pattern instructed the sewer to cut a piece of bias binding to use as casing for the elastic at the back of the bonnet and to sew a narrow hem at the side and bottom back edges of the bonnet.
 I had sewn the bonnet on the right using that method.
I saw two problems with that method
1. Bias binding wastes a lot of material because of having to cut it on a 45 degree angle to the selvage.
2. I find pressing and sewing the narrow hem to be tedious and time consuming.
Also, I think my alternative method (shown on the left of the photo above) gives a much more "finished" look to the bonnet.
 STEP 4: I turned the fabric right sides together and stitched the side seams. Turned the fabric and pressed. This step eliminates the need for a narrow hem. STEP 5: I turned inder 1/4" at the top and stitched it closed. (This formed the top of the casing for the elastic.) STEP 6: I sewed a second line of stitching 1/2" inch below the STEP 5 line of stitching. (This formed the bottom of the casing for the elastic.) STEP 7: Last, I inserted the elastic into the casing. At this point it looked like the above photo.
Keep Sewing!
If this tip has helped you or sparked your creative juices, let me know, and I'll keep trying to add these little sewing tips to my blog in the future.
To view craft projects shared by other bloggers or the share your own creations, be sure to visit SEW CRAFTY FRIDAY on Shereen's blog at http://www.w8ng4him.blogspot.com/
1. Bias binding wastes a lot of material because of having to cut it on a 45 degree angle to the selvage.
2. I find pressing and sewing the narrow hem to be tedious and time consuming.
Also, I think my alternative method (shown on the left of the photo above) gives a much more "finished" look to the bonnet.
So, here's my remedy... STEP 1: I drew a line 3/4 inch above the line for the bias binding placement printed on the pattern. (This allows for 1/2 inch casing for the elastic and 1/4 inch to be turned under for a clean finished edge. STEP 2: I made a photo copy of the section I wanted to copy and cut it out up to the line I drew. No Copier? Place a piece of tissue paper over the original pattern and trace the lines up to the line that was drawn.
 STEP 3: I taped it to the bottom of the pattern to produce a mirror image. To do this I had to flip the copy over (printed side of copy would not be seen because it was facing down). STEP 4: I pinned the adjusted pattern piece to the fabric and cut it out.
 STEP 1: I drew a line 3/4 inch above the line for the bias binding placement printed on the pattern. (This allows for 1/2 inch casing for the elastic and 1/4 inch to be turned under for a clean finished edge. STEP 2: I made a photo copy of the section I wanted to copy and cut it out up to the line I drew. No Copier? Place a piece of tissue paper over the original pattern and trace the lines up to the line that was drawn.STEP 3: I taped it to the bottom of the pattern to produce a mirror image. To do this I had to flip the copy over (printed side of copy would not be seen because it was facing down). STEP 4: I pinned the adjusted pattern piece to the fabric and cut it out. STEP 4: I turned the fabric right sides together and stitched the side seams. Turned the fabric and pressed. This step eliminates the need for a narrow hem. STEP 5: I turned inder 1/4" at the top and stitched it closed. (This formed the top of the casing for the elastic.) STEP 6: I sewed a second line of stitching 1/2" inch below the STEP 5 line of stitching. (This formed the bottom of the casing for the elastic.) STEP 7: Last, I inserted the elastic into the casing. At this point it looked like the above photo.
Because I often make these bonnets to sell or give as gifts, the changes made to the pattern piece will save me material and time on future projects.
Don't be afraid to adjust or change a pattern to suit yourself or to make it more user friendly. It's not hard to do. Usually, it just takes some good common sense. If you are making several items from the same pattern (perhaps for a craft show or perhaps for several items from a favorite pattern), the small amount of time it takes to change the pattern will save you much more time in the future.
Keep Sewing!
If this tip has helped you or sparked your creative juices, let me know, and I'll keep trying to add these little sewing tips to my blog in the future.
To view craft projects shared by other bloggers or the share your own creations, be sure to visit SEW CRAFTY FRIDAY on Shereen's blog at http://www.w8ng4him.blogspot.com/
Wednesday, August 13, 2008
A Day Trip Mystery
My dear hubby had a six-month medical check-up scheduled for this morning. This entails a three-hour drive to the Harrisburg area where his doctor is located. Usually we just go as a family and make a day of it together. Once the doctor's appointment is over, we visit some of the attractions in the area. Today was hubby's turn to pick our destination. Can you guess where we went today? Are these pictures a hint?


No, not the zoo...

Whoa, what's wrong with this picture?

 Dad helps his boy look for a call - a fawn bleat.

Dad and the kids check out the amo. Next stop ... reloading suppies.


No, not the zoo...

Whoa, what's wrong with this picture?
Look closely, it's another clue.

Well, of course...
Hubby's favorite destination in the Harrisburg/Hamburg
area is Cabellas.
Dad helps his boy look for a call - a fawn bleat.
Dad and the kids check out the amo. Next stop ... reloading suppies.
You know I often wonder if the reason that my husband chose a doctor three hours away is so that he has an excuse to visit his favorite store twice a year. ; ) Really, if you've never been to a Cabellas, it is quite interesting. The animals in the photos above are part of their massive taxidermy displays that are located throughout this MASSIVE store. There are hundreds of specimens in a single store. Most displays label the animals in the display. In addition, there are floor to ceiling aquariums stocked with Pennsylvania fish and information pertaining to them. So even those members of the family who are less interested in the "hunting, fishing, camping" merchandise, just might enjoy the other perks at this store.
Monday, August 11, 2008
The Heavens Declare
 My youngerdaughter has become our resident "shutterbug". An evening or so ago she came rushing into the house, grabbed her camera on the fly, and was back out the door again faster than I could ask, "What's happening? Where are you goin?" Now I'm an extremely curious type, so it seemed the only action for me was to rush out after her and find out what was causing all the excitement. THIS is what met my eyes. I wanted to share it with all of you.
 We watched this kaliedoscope change before our eyes.
 We marveled at the beauty.
 I silently worshipped my God who can paint the sky in such a breathtaking way...
 until at last we were viewing a serene sky with only the moon peeking through the clouds.
I was left thanking God for my twelve year old's love for the beauty of God's creation and for her desire to chronicle it. All the while I watched, I kept reflecting on Psalm 19:1 - 6
"The heavens declare the glory of God; And the firmament shows His handiwork. Day unto day utters speech, and night unto night reveals knowledge. There is no speech nor language where their voice is not heard. Their line has gone out through all the earth, and their words to the end of the world. In them He has set a tabernacle for the sun, which is like a bridegroom coming out of his chamber, and rejoices like a strong man to run its race. Its rising is from one end of heaven, and its circuit to the other end; And there is nothing hidden from its heat."
What a gracious and good God to declare Himself in such a way that no one on this entire globle has not seen the beauty of nature calling out that there is a Creator God. Should this not drive us to the more specific declaration He gives us in His Holy Scriptures?
Friday, August 8, 2008
Sew Crafty Friday - Bonnet Babes
 I am so excited today... I have often enjoyed looking at all the projects on Sew Crafty Friday,
Today, this is my first contribution. This is what has been my priority project for the week.
 I have a bonnet each for two little girls I know and a bonnet for the one's 18" doll.
INTERFACING TUTORIAL
Most patterns do not give separate pattern pieces for interfacing. Instead the pieces that need interfaced have instructions something like this:
Trim 1/2" seam allowances from interfacing sections before fusing to collar, cuffs, etc.
I believe I have a better way. This is a very fast and easy way to make a pattern for the interfacing that can be slipped into the pattern package for the next time you use that pattern.
 STEP 1: Cut the number of pieces of fusible interfacing that are needed for the project you are working on. In this example I needed two pieces to fuse to each of the brim pieces. In addition cut one piece from thin non-fusible interfacing. (I keep some non-fusible interfacing on hand for this purpose). To save time I layer the fusible and the non- fusible interfacing and cut all three pieces at the same time.
 You are cutting the interfacing from the same pattern piece from which you cut the fabric.
 When I was done cutting the pieces for the brim, I had cut five pieces that were exactly the same size -
 2 from from fabric
2 from fusible interfacing
and
1 from non-fusible interfacing
(the scissor tips are pointing the to non-fusible interfacing that will become my interfacing pattern when I make this pattern in the future.)
 STEP 2: Next measure the seam allowance marked on the pattern piece.
 STEP 3: Align the fusible interfacing and the non-fusible interfacing and pin the edges together.
Now sew them together using 1/8" less seam allowance than you measured on the
pattern piece in the Step 2. For instance: if the seam allowance on the pattern piece
measures 5/8", you would stitch the interfacing together using a 1/2" seam
allowance. 5/8" - 1/8" = 4/8" or 1/2"
 STEP 4: Now cut directly on the stitching line to remove the seam allowance.
 STEP 5: Gently separate the layers from each other.
 Note that I have a piece of fusible interfacing to fuse to both of pieces of fabric for the brim. I also have a piece of left over non-fusible interfacing (at the top of the photo) that I can now use the next time I cut out interfacing for this pattern.
  The original pattern piece for the fabric is at the top.The pattern piece I made from the non-fusible interfacing is at the bottom.
STEP 6: Write the name of the pattern company, the number of the pattern, the name of thepattern piece, how many to cut of your pattern piece, and the size.
On the interfacing pattern in my example I wrote
McCalls
#3827
Brim Interfacing
Cut 2
(As this was a doll pattern, there was no need for size.)
STEP 7: Tuck it away with the rest of the pattern in the pattern envelope. The next time I use this pattern, there will be no need to trim the interfacing; this will save me considerable time. I will simply use this new pattern piece I created for the interfacing and eliminate the need for trimming.
Please let me know if you find this tuturial helpful. In future posts I plan to share more helpful tips that I have gleaned in my nearly forty years of sewing.
Please let me know if you find this tuturial helpful. In future posts I plan to share more helpful tips that I have gleaned in my nearly forty years of sewing.
Wednesday, August 6, 2008
The First Fruits of Harvest

Under normal circumstances a basket full of Jalapeno peppers would not excite me!
It's not that I don't like things to have a little nip, I do.
I just don't like my food to be so spicy that it overwhelms the flavor.
In past years when my dear husband (dh) planted Jalapenos in the garden,
they wer HIS baby.
I left them it to him
to plant them,
pick them, and
preserve them.
Ahh! But this year was different.
This year I have anxiously awaited their harvest since the time they were planted in June.
My dd1 and I were planning to make a most wonderul little delicacy...
JALAPENO JELLY
Monday, my ds picked the first basket full
and my dd1, clad in her best latex gloves went right to work.
She prepared it all and together we canned it.

This was the final result. Three pints of this luscious little spread.
And we are not so selfish that we would not share it with you.
3/4 pound jalapeno peppers (unseeded, with stems)
3/4 pound jalapeno peppers (unseeded, with stems)
2 cups cider vinegar, divided
6 cups sugar
2 pouches liquid pectin
Green food coloring, optional
Wash peppers, drain. Remove stems and seeds.
Puree peppers and 1 cup vinegar in a food processor or blender.
Combine puree, 1 cup vinegar and sugar in large saucepot.
Bring to a boil, and boil for 10 minutes, stirring constantly.
Stir in liquid pectin.
Return to a rolling boil. Boil hard 1 minute, again, stirring constantly. Remove from heat.
Skim foam if necessary.
Stir in a few drops of food coloring, if desired. Ladle hot jelly into hot, sterilized jars, leaving 1/4 inch headspace. Adjust two-piece caps. Process 10 minutes in a hot water bath canner.

Now you may be saying, "Gee, I don't know... Jelly made of Jalapenos. It just doesn't sound like those two words should be used together"
I understand completely! Those were my sentiments exactly before tasting it.
I first tasted this love of mine when I was at the home of a dear friend who lived nearby.
She was giving a Baby Celebration for another dear friend.
She served it on crackers topped with a little cream cheese and the jelly.
A few weeks later she moved away when her husband took a new position further north of here. I dearly miss her, but I just got the good news that
she is at last able to move into her new home there.
So as I enjoy this little snack, I raise it in salute to you , Rebecca.
Here's to good friends, good memories, and anticipated future visits to your new home.
Friday, August 1, 2008
Best Laid Plans of Mice and Men

About a week ago my dear daughter #2 (dd2) and my dear and only son (ds) went off traipsing the countryside near our house and came home with quite a few wild raspberries. It was then that I devised my plan. I needed to go back through the woods with them, and we would pick a bucket of raspberries. I would bake something deeeeeee-licious. Hmmm…what would it be? Maybe raspberry cobbler. Now there was a second part to my plan. I would take a spade and a second bucket along, dig up some of the very small bushes and transplant them to my backyard. Then they would multiply and someday I could have all the raspberries my little heart desired.
 So late this afternoon, my ds became my guide, and an excellent guide he is. The time he has spent on his constant treks through these parts has been well spent. He knows this area like the back of his hand. Along the way he directed my attention to several points of interest. Other places he forsook the trails to lead me over his own “shortcuts”. Now while it was not hot today, I still became warm from the exercise of ducking under this branch and stepping over that fallen tree. However, I encouraged myself with the thoughts of the pail of raspberries that would be my reward. I was also thinking that raspberry bushes planted near the house would make this trek unnecessary.
Now I am a transplanted country girl; and while I have been learning a little about gardening, birds, critters, and the like, my city girl ignorance often outshines my best country girl intentions. This was one of those times. When we arrived at the raspberry bushes, there were very few berries left on the bushes. (A good country girl probably would have known that this was the end of the season). A note to you true country girls that are reading this, I would appreciate it if you would please stop your snickering. Anyway, we came home with a few paltry raspberries. We picked a few blackberries (not nearly as sweet as the raspberries), and I am not sure why we even bothered to do that. I was too disheartened to even dig up a few small bushes to bring home. Well, I guess there’s no raspberry cobbler tonight. Sigh.

However, I did get a nice hike. I definitely can use the exercise. The scenery was lovely. I got to see a big patch of native white Bee Balm that the bees were really working.
I even got this picture of a bee that is called “Hummingbird Bee”. This is only the second time I have ever seen one. Strangely enough, last Sunday in the flower garden in front of my house was the first time. I had never even heard of them until a sweet friend of mine described one she had seen last summer. From the picture it is a little hard to see, but they really do look like a miniature hummingbird. Their wings beat every bit as fast. They really are fascinating!

However, the really good thing about all of this was that I got to spend a few hours of one-on-one time with my very favorite guide. I guess it really was a pretty nice day.
Subscribe to:
Posts (Atom)


