Bringing Katya Home Blog

Thursday, May 20, 2010

Crochet Wallet

Many of you needleworkers and crafters can completely understand what I am saying.

  • Although I could probably fill a small room from wall-to-wall and floor-to-ceiling with the items I have made, very few of them now belong to me. Aside from some clothing I have made myself and a couple other items, the rest has been for my children, or to give as gifts, or to sell.
  • For years (and years), I have wanted to make a case to keep my crochet hooks in. I have lost, misplaced, or my daughters have walked off with so many of my hooks that I have lost track. So often I would finally buy another and THEN find the original hook later. I needed a central place to keep them, a place where I would know if one were missing. But I just never got around to making myself a case, because I just wasn't sure what I wanted exactly. That is until I saw a crochet wallet similar to the one below.

I was so excited while I was sewing this. With just a tweak or two, I knew this was exactly what I needed.
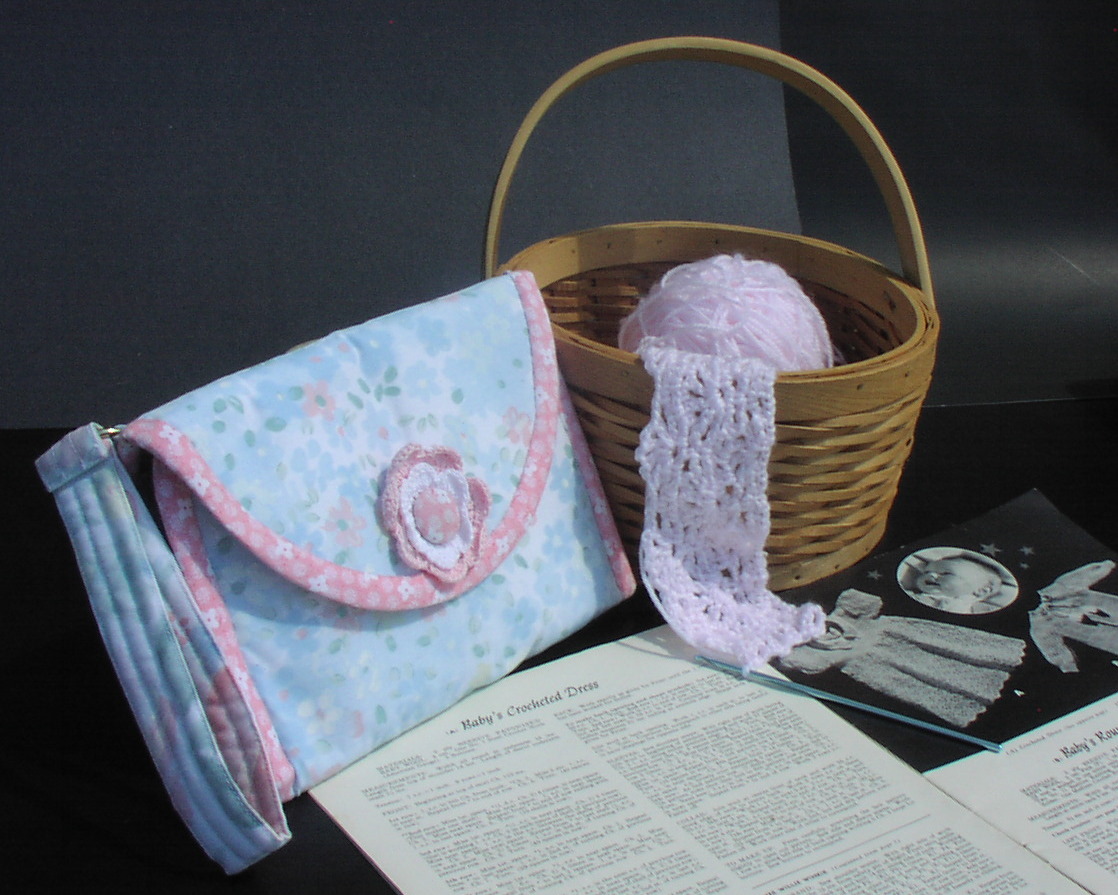

It is a trifold, closes with a snap, has a handy little wrist strap to free my hands for all the other things I am dragging along with me (crocheting, or knitting is a very portable craft item -- much better than trying to drag a sewing machine with you). Wink, wink. The crochet flower with the covered button is just there for looks. Since it is a Crochet Wallet, it seemed fitting that something on it was crocheted, right?

This is the inside. Lots of room for hooks as well as a see-through pocket to hold such things as gauges, measuring tape, little rings to mark stiches. . . just anything my little ol' heart desires. The half-moon shape at the top is a padded pin cushion to keep a needle and a few pins "nearby and handy."

I thought you might like to see what it looks like empty.

The original wallet that I saw did not have the pocket in the back. I added it for more storage. I keep a notepad and pencil there to record any projects I am working on. I write down what size hook the project requires and return the hook to the clutch even though the project isn't complete. Yeah! No more lost hooks!

The really great thing about all of this is that I only spent fifty-cents to buy 2 zippers at a local surplus store. The rest was all made from left-over scraps that I had hangin' around from previous projects.

So, this one is a keeper -- just for ME!

Saturday, May 15, 2010

Foto Friday (Saturday?) Challenge - Sky/Clouds

May is always a rough month for us here at Brambleberry Cottage. The end of the official homeschool year is in sight, but pressure to tie up last minute details like putting finishing touches on state required portfolios, meeting with evaluators, making sure that all medical requirements (eye exams, dentist exams, physicals, etc.) have been completed, and wondering over and over again if I have forgotten anything just drains me. In addition, I have several projects I am working on to give as gifts and several of them are already belated. Visions of half-completed projects and projects that need to be completed (though as of yet unstarted) haunt me as I close my eyes at night. I DO NOT handle deadlines well.

All that said, you can understand why a dreary sky overhead all week made it easy for me to decide NOT to try to participate in Foto Friday this week. That was until this evening.

It had been a hot, muggy day all day today. At times the sun peeked through the clouds today. At other times it was raining. It was that way all day long. Then this evening after supper, things began to get really interesting. The wind really kicked up, and the first thing we knew it was hailing. Not little pitter-pattery hail (which is the only kind I have ever seen), but good-sized goobers the size of acorns and walnuts.

When it was all over, we went out to survey the damage. What was amazing was the sky! And believe me, these pictures are a very poor representation of what we saw.

Every section of the sky was different and would change so quickly it was like looking at time-lapse photography. Clouds were moving at different speeds at different altitudes. The higher clouds were speeding by, while the lower ones were almost standing still. It really gave an eerie 3-D effect to the sky.


All these pictures of the sky were snapped within a four or five minute span. While I'll be the first to admit that there is nothing particularly artistic about the photos, there was truly something beautifully artistic about the "real thing"! I just had to marvel at our Creator God.


After we stood and watched the sky for sometime, the little spring went off in this steel-trap mind of mine, and I realized I ought to get some pictures to record the hailstones before they completely melted in the heat. (I wish now I had put a familiar object to compare the size of the hailstones in the shot?) Afterthoughts, you know.


The wind had driven these up against our steps in a pile, so they didn't melt quite as quickly.


This is what the grass looked like about forty-five minutes after it had stopped hailing.


A shot of the debris that was plastered to the side of the house. I guess I know what I'll be doing in the morning. (SIGH, SHOULDERS DROOP)

I have definitely stayed up farrrrrrrr to late to post this. (There's got to be something wrong with my mind -- what was I thinking?) Now it's off to bed for me and visions of unfinished check lists dancing in my head.


Just click the Foto Friday button to see how others interpretted this week's subject, which btw was "Sky/Clouds".

Thursday, April 29, 2010

Gentle

I know there are some of you who are anxiously awaiting a glimpse of this little rosebud that just arrived last week. We had the chance to visit her family and become aquainted with her last evening. She is just a tiny little peanut, and beautiful in everyway. How can we not marvel at our Creator?

Her doting "big" brother keeps a constant watch over her. These sdays, his favorite word seems to be "gentle", and he repeats it over and over while caressing her and kissing her. He is definitely smitten with his newest sister.

None of us could get enough of holding her and cooing over her. It's so easy to forget how tiny and feather-weight a newborn is.

She is absolutely adorable!!!

Pattern Sale at JoAnn Fabrics - First Half of May 2010


I have been swamped with sewing projects lately. I even managed to get a sewing project done that is a gift for MYSELF. That doesn't happen very often, so I'm really excited. I just have one more small detail to finish on it before I can show you what it is. But that can all wait, because of course, I know what you are really interested to find out -- the dates for the pattern sale at the JoAnn Fabric and Craft stores.

SATURDAY, MAY 1, 2010
McCall Patterns - $1.99 each
MSRP $6.95 - $19.95 each
Limit 10
No Special Orders
Excludes "Easy Stitch 'N Save"

Butterick Patterns - $1.99 each
MSRP $7.95 - $19.95
Limit 10
No Special Orders
Excludes "See &Sew"

Thursday, April 22, 2010

Foto Friday Challenge - Red


Little Red Caboose Behind the Train


Here's my contribution to this week's Foto Friday Challenge. The topic is RED.


Little Red Caboose, chug, chug, chug

Little Red Caboose, chug, chug, chug

Little Red Caboose behind the train, train, train, train

Comin' round the bend, bend, bend, bend

Hangin' on the end, end, end, end

Little Red Caboose behind the train


Find lots of other pics that will have you "seein' red" by clicking on the button below.


Wednesday, April 21, 2010

The Second-Half of the Equation

In addition to being sure that I interfaced the buttonhole as explained here, I also needed to add manageable bulk to the strap in order to produce a larger knot that would not slip through the buttonhole. The following illustrations explain how I accomplished that.


If the interfaced yoke and buttonhole in addition to the additional width of the strap don't rectify the problem of the buttonhole drooping and the knot slipping through, I'm not quite sure what else to suggest. The only thing I can thnk of is making the buttonhole a little smaller.

Monday, April 19, 2010

Remedy for Droopy Buttonholes

I have decided to answer a comment on a recent post here rather than in the comments section because (1) the answer to the question may help others that have the same problem and (2) because I think that the photos will help illustrate what I am trying to say.
The question pertained to preventing "droopy buttonholes" (my words) that occur in knot jumpers. Any buttonhole causes a lot of stress on a garment's fabric around it just by the normal movement of the body. So my rule of thumb in my own sewing projects is that I NEVER, EVER make a buttonhole until I first interface the fabric. In the case of this jumper and this jumper, I reinforced the entire yoke, because the entire yoke can begin to "droop" with the stress of the weight of the full skirts that they must support.
There are other times that in an infant dress or doll's dress I may choose only to "spot interface a buttonhole" to prevent bulk while still reinforcing it. In such a case, I would cut two squares of light to midweight interfacing. Each square would be slightly larger than the length of the buttonhole. Then, I fuse them to the inside of the fabric where the buttonhole will be located. (In the illustration below, I used heavyweight interfacing so that it woud be more visible in the pic.)
The advantage to interfacing both insides in that it will also help prevent fraying of the fabric in the same way a "fray check" product would.

In preparing the example of buttonholes above, I was also struck by the appearance of the buttonhole even before use. Notice that the fabric fibers on the right buttonhole were stabilized, and therefore did not shift or stetch as the buttonhole was being sewn.

Another thing that can be seen from the above photo, is that the stess of cutting the buttonhole also was minimized in the interfaced buttonhole. One more little note about interfacing is illustrated in the photo above, and that is the importance of using the proper weight of interfacing for your projects. When the weight of the interfacing matches your fabric weight you will not see the interfacing "shadow" that is evident in the photo above. If you see "where the interfacing has been used", you need to be using a lighter weight interfacing.

I'm running a little short on time here, so I'm going to address how I keep the knots from slipping through the buttonholes in another post.

Hope this helps.
Related Posts with Thumbnails