As you teach your student, continue to remind her of the importance of accurate measurements when pinning a pattern on the straight of the fabric and the importance of cutting accurately, as well as the importance of finishing her seam edges TO PREVENT FRAYING. Remind her to backstitch at the beginning and end of all seams. Refer to Lesson 2 - STEP 4.
Allow the student to take more than one session to sew her project. It doesn't need to be finished in one marathon session. If she becomes frustrated at a certain step, tell her to set it aside, and that you will work on it with her again later. Remember, we are not only teaching her HOW to sew, but also to ENJOY sewing.
Rather than show a technique that we have covered in a past lesson, I will simply refer you back to previous lessons and the STEP # that covers the particular technique.
Camisole Pattern made from Lesson 3 - Part 1
Fat-Quarter of lightweight cotton fabric
Thread that matches fabric
Small piece of lightweight, fusible interfacing
24" of 1" wide flat eyelet lace
18" inches of ribbon
(2) Size/No. 1 snaps
Straight pins
Ruler
Scissors
Needle
EXPLANATION OF LACE AND RIBBON

Your student will be cutting two 4" lengths of ribbon for the straps of the camisole. The type and width of the ribbon is a matter of personal preference. The photo above shows some suggestions. Looking at the ribbon from the top right of photo to bottom left, the first ribbon is 3/8" wide (used alone it would be appropriate for a spaghetti strap). Next is a cotton beading eyelet which is approximately 1/2" wide. Next we have a 1/4" wide satin ribbon that would make a thin strap. Last is a 3/4" wide satin ribbon that would make a wide strap. Personally, I would stay in the 3/8" to 3/4" width range. The color of the ribbon could match or contrast with the fabric you have chosen, and you could use grosgrain ribbon, cotton ribbon, or satin. The choice is yours.
 The above photo shows the eyelet lace (top of photo) which I have chosen for the hem of my doll's camisole. The ribbon and beading eyelet will be used in combination for the straps.
I simply wove my ribbon through the beading eyelet to prepare it for the straps.

STEP 4: Following the manufacturer's instructions, fuse the interfacing to the edge of the camisole back as shown in the above photo.
Explain to your student that a facing is a method used to give a "finished" edge to a garment. There are other methods to finish the edge of a garment, but this method is quite common with the manufacturers of sewing patterns.
 STEP 6: With right sides of fabric facing each other, pin the edges of the camisole and facing as show in the above photo. Stitch seam (as indicated by blue line in above photo) and finish raw seam edges. Refer to Lesson 2 - STEP 6. Repeat for other half of back camisole.
STEP 7: Cut 2 lengths of ribbon for straps. Each shoud be 4" long.
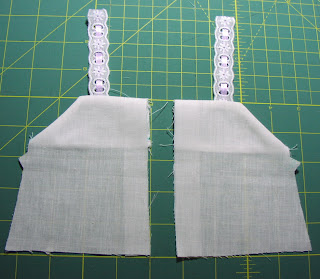
 STEP 9: Turn pieces to right side out and press with iron. The student should have two backs of the camisole that look like the above photo.
REPEAT STEPS 6 - 9 FOR FOR CAMISOLE FRONT & FACING.
STEP 10: Explain to your student that NOTCHES are used by pattern makers for several purposes. One purpose is to indicate edges that go together; a second purpose is to properly align the edges of a garment. With right sides of fabric together, match the notch on the back of camisole with the notch on the front and pin the front and back together at that point. Then match the top edge together and pin at that point. Last, match and pin the bottom of the side edge. Repeat pinning procedure on other side of garment.

STEP 11: Sew both side seams as indicated by blue line in above photo. Finish raw seam edge. Press seams toward back of garment.
 STEP 12: Fold remaining ribbon in half and mark center. Stitch securely to cener front of camisole. Tie a bow. Cut ends of ribbon diagonally.
Congratulations! You have now completed a camisole that your 18" doll can wear with the skirts you created in Lessons 1 & 2.


No comments:
Post a Comment