
 I am so excited today... I have often enjoyed looking at all the projects on Sew Crafty Friday,
Today, this is my first contribution. This is what has been my priority project for the week.
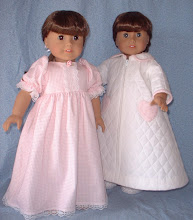
 I have a bonnet each for two little girls I know and a bonnet for the one's 18" doll.
INTERFACING TUTORIAL
Most patterns do not give separate pattern pieces for interfacing. Instead the pieces that need interfaced have instructions something like this:
Trim 1/2" seam allowances from interfacing sections before fusing to collar, cuffs, etc.
I believe I have a better way. This is a very fast and easy way to make a pattern for the interfacing that can be slipped into the pattern package for the next time you use that pattern.
 STEP 1: Cut the number of pieces of fusible interfacing that are needed for the project you are working on. In this example I needed two pieces to fuse to each of the brim pieces. In addition cut one piece from thin non-fusible interfacing. (I keep some non-fusible interfacing on hand for this purpose). To save time I layer the fusible and the non- fusible interfacing and cut all three pieces at the same time.
 You are cutting the interfacing from the same pattern piece from which you cut the fabric.
 When I was done cutting the pieces for the brim, I had cut five pieces that were exactly the same size -
 2 from from fabric
2 from fusible interfacing
and
1 from non-fusible interfacing
(the scissor tips are pointing the to non-fusible interfacing that will become my interfacing pattern when I make this pattern in the future.)
 STEP 2: Next measure the seam allowance marked on the pattern piece.
 STEP 3: Align the fusible interfacing and the non-fusible interfacing and pin the edges together.
Now sew them together using 1/8" less seam allowance than you measured on the
pattern piece in the Step 2. For instance: if the seam allowance on the pattern piece
measures 5/8", you would stitch the interfacing together using a 1/2" seam
allowance. 5/8" - 1/8" = 4/8" or 1/2"
 STEP 4: Now cut directly on the stitching line to remove the seam allowance.
 STEP 5: Gently separate the layers from each other.
 Note that I have a piece of fusible interfacing to fuse to both of pieces of fabric for the brim. I also have a piece of left over non-fusible interfacing (at the top of the photo) that I can now use the next time I cut out interfacing for this pattern.
  The original pattern piece for the fabric is at the top.The pattern piece I made from the non-fusible interfacing is at the bottom.
STEP 6: Write the name of the pattern company, the number of the pattern, the name of thepattern piece, how many to cut of your pattern piece, and the size.
On the interfacing pattern in my example I wrote
McCalls
#3827
Brim Interfacing
Cut 2
(As this was a doll pattern, there was no need for size.)
STEP 7: Tuck it away with the rest of the pattern in the pattern envelope. The next time I use this pattern, there will be no need to trim the interfacing; this will save me considerable time. I will simply use this new pattern piece I created for the interfacing and eliminate the need for trimming.
Please let me know if you find this tuturial helpful. In future posts I plan to share more helpful tips that I have gleaned in my nearly forty years of sewing.
Please let me know if you find this tuturial helpful. In future posts I plan to share more helpful tips that I have gleaned in my nearly forty years of sewing.


5 comments:
That is an awesome idea!! I read all the way through and it just makes SO much sense!!! Thanks!! I will definitely remember that!!
And the bonnets are SOOO incredibly sweet!!!!! I can't wait to get more into doll dress making once my daughters are older. Actually, my youngest daughter is the only one that likes "dolls" :) I have a few doll clothes patterns but get so busy making other things I haven't taken much time for dolls!! I think I might try to work some up for Christmas :) Great work!!!
I think it's a brilliant idea, and I'm going to use it next time I have a pattern I know I'll use more than once.
The bonnets are precious!
I just wanted to say,"THANKS" to purityseekers and mom2fur for stopping by. I'm new to blogging, and it nice to have visitors. Thanks for the nice comments. I'm glad the "sewing tip" was helpful.
Welcome to Sew Crafty Friday!
Looks like you are another American Girl lover. Both my daughter and I have fun with ours.
Hi Nanci,
Thanks for participating in SCF. Thanks for also sharing your tip/tutorial on the interfacing with the bonnet. I am in the process of making my younger daughter a dress, and she requested a bonnet to go with it. I'll be sure to come back and follow your tutuorial. ;0) The bonnets came out too cute.
Post a Comment