
Before I share a recent sewing project with you, I want to apologize to anyone who tried last week to visit our Sew Crafty Friday page from the link on Shereen's blog and found themselves on the wrong page here at Brambleberry Cottage. I set the link just to come to my blog and not to a particular page. The good thing is that I have learned from my mistake .
...And now on to our project...
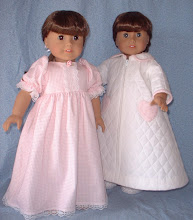
The project I have been working on this week is very "hush - hush" (A gift to be given) and so I certainly could not display it here for prying eyes to see. LOL So instead I will share a project I did earlier this year ... a dress for a dear little friend and her AG doll.
 This is a photo I took of the dress (modeled by my dd2's doll) before I sent it to Grace for her birthday.
Children's apparel is my favorite item to sew. I love all the special touches that can be added -- embroidery, tucking, piping and the like.I used Vogue Pattern #V7958 for a matching little girl's dress. I did change the collar to a peter pan style collar rather than use the collar that was used on the original pattern. I can never leave patterns well enough alone. LOL
The AG Doll dress was not actually a particular pattern. I designed it to match Grace's dress.
SEWING TUTORIAL AND TIPS
Making a pattern more "User Friendly"
 You might remember these bonnets from last week's post. I'd like to use them as an example of making a pattern more user friendly (and time saving).
 For the little girl bonnets I had used Simplicity Pattern #5042. The pattern instructed the sewer to cut a piece of bias binding to use as casing for the elastic at the back of the bonnet and to sew a narrow hem at the side and bottom back edges of the bonnet.
 I had sewn the bonnet on the right using that method.
I saw two problems with that method
1. Bias binding wastes a lot of material because of having to cut it on a 45 degree angle to the selvage.
2. I find pressing and sewing the narrow hem to be tedious and time consuming.
Also, I think my alternative method (shown on the left of the photo above) gives a much more "finished" look to the bonnet.
 STEP 4: I turned the fabric right sides together and stitched the side seams. Turned the fabric and pressed. This step eliminates the need for a narrow hem. STEP 5: I turned inder 1/4" at the top and stitched it closed. (This formed the top of the casing for the elastic.) STEP 6: I sewed a second line of stitching 1/2" inch below the STEP 5 line of stitching. (This formed the bottom of the casing for the elastic.) STEP 7: Last, I inserted the elastic into the casing. At this point it looked like the above photo.
Keep Sewing!
If this tip has helped you or sparked your creative juices, let me know, and I'll keep trying to add these little sewing tips to my blog in the future.
To view craft projects shared by other bloggers or the share your own creations, be sure to visit SEW CRAFTY FRIDAY on Shereen's blog at http://www.w8ng4him.blogspot.com/
1. Bias binding wastes a lot of material because of having to cut it on a 45 degree angle to the selvage.
2. I find pressing and sewing the narrow hem to be tedious and time consuming.
Also, I think my alternative method (shown on the left of the photo above) gives a much more "finished" look to the bonnet.
So, here's my remedy... STEP 1: I drew a line 3/4 inch above the line for the bias binding placement printed on the pattern. (This allows for 1/2 inch casing for the elastic and 1/4 inch to be turned under for a clean finished edge. STEP 2: I made a photo copy of the section I wanted to copy and cut it out up to the line I drew. No Copier? Place a piece of tissue paper over the original pattern and trace the lines up to the line that was drawn.
 STEP 3: I taped it to the bottom of the pattern to produce a mirror image. To do this I had to flip the copy over (printed side of copy would not be seen because it was facing down). STEP 4: I pinned the adjusted pattern piece to the fabric and cut it out.
 STEP 1: I drew a line 3/4 inch above the line for the bias binding placement printed on the pattern. (This allows for 1/2 inch casing for the elastic and 1/4 inch to be turned under for a clean finished edge. STEP 2: I made a photo copy of the section I wanted to copy and cut it out up to the line I drew. No Copier? Place a piece of tissue paper over the original pattern and trace the lines up to the line that was drawn.STEP 3: I taped it to the bottom of the pattern to produce a mirror image. To do this I had to flip the copy over (printed side of copy would not be seen because it was facing down). STEP 4: I pinned the adjusted pattern piece to the fabric and cut it out. STEP 4: I turned the fabric right sides together and stitched the side seams. Turned the fabric and pressed. This step eliminates the need for a narrow hem. STEP 5: I turned inder 1/4" at the top and stitched it closed. (This formed the top of the casing for the elastic.) STEP 6: I sewed a second line of stitching 1/2" inch below the STEP 5 line of stitching. (This formed the bottom of the casing for the elastic.) STEP 7: Last, I inserted the elastic into the casing. At this point it looked like the above photo.
Because I often make these bonnets to sell or give as gifts, the changes made to the pattern piece will save me material and time on future projects.
Don't be afraid to adjust or change a pattern to suit yourself or to make it more user friendly. It's not hard to do. Usually, it just takes some good common sense. If you are making several items from the same pattern (perhaps for a craft show or perhaps for several items from a favorite pattern), the small amount of time it takes to change the pattern will save you much more time in the future.
Keep Sewing!
If this tip has helped you or sparked your creative juices, let me know, and I'll keep trying to add these little sewing tips to my blog in the future.
To view craft projects shared by other bloggers or the share your own creations, be sure to visit SEW CRAFTY FRIDAY on Shereen's blog at http://www.w8ng4him.blogspot.com/


2 comments:
WOOOOOO HOOOOO!!!!!
Look at you Nanci-pants! I just checked my yahoo email (after an exhausting day) and followed the link and GASPED at what I saw! You've STARTED blogging-and may I say: with a BANG!!!
I am So thankful to see pictures of everyone and to hear your latest and greatest...and even glean more knowledge from you over these long distance wires! I am so thankful you started to blog. I love it. LOVE it.
Love your creations, your thoughts, your tips, and just...YOU.
Oh, my gosh, the dresses are so sweet! I used to love to sew for my daughter when she was little, and enjoy sewing for friends' grandchildren nowadays. You are right...children's clothing offers a lot of possibilities for being creative. Have you ever seen Ottobre magazine or Sew Beautiful? Gorgeous kiddie things there, too!
Post a Comment