
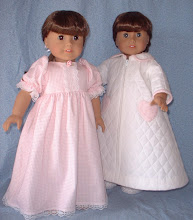
 In my last sewing tutorial, I showed how to streamline a pattern to eliminate the need for making bias binding. However there are times when this cannot be done. For instance the method I last showed you would not work if the bias binding had to be placed on a curve. In addition there are times when bias binding is used as a decorative touch as on the collar in the above photo.
In the past I have found making bias binding to be time-consuming, but now I have found a "little helper" that eases the labor of making bias tape. So let's take a look at a relatively quick way to make bias binding.
 Step 1: Gather the following tools and supplies: Cutting mat, rotary cutter, ruler, bias tape maker, iron, and of course, fabric.
 Step 2: Align 45 degree line on the ruler with the selvage edge of the fabric.
 Step 3: Rotary cut the fabric. Discard the inital triangular piece of fabric or save it to your scrap bag.
 Step 4: The width of the next strip will vary depending on the width of bias binding you are making. My bias tape maker makes 1/2 inch bias binding, so according the directions included with it I cut my next strip 1 1/8 inches wide. Continue to cut as many strips as needed for the length of bias binding needed for your particular project.
 STEP 5: After cutting all your strips you will need to sew them together. Place two strips together to form a 90 degree angle. Right sides of the fabric are facing each other. They should be placed on top of each other exactly as shown in the above photo. Pin together to prevent them from slipping out of place.
 STEP 6: Sew together using 1/4" seam allowance. I usually use a very small stitch and eliminate the back stitching.
 Step 7: Press all seams open.
 STEP 8: Using rotary cutter trim away all extra fabric at the seams.
 Ths is a photo of the bias tape maker I use. This "little helper" and the rotary cutter are what really speeds up the bias binding procedure. The bias tape maker is manufactured by Clover Mfg. Co. LTD. I purchased it at JoAnn Fabrics. I never pay full price for my sewing gadgets because in my opinion they are all over-priced. I usually wait until I have the store's coupon and purchase the gadget for 40% off. The bias tape maker is available in the following widths: 1/4", 1/2", 3/4" 1", and 2".
STEP 9: Insert fabric strip into end of bias tape maker.
 STEP 10: Then pull the bias tape maker slowly while ironing the folded tape.
 The result is perfectly straight and pressed bias binding that matches and is ready to be used in your project.
NOW GET SEWING!


3 comments:
Hi Nanci!
This is Rebecca's Sister- Welcome to blogland :) I look forward to gathering heaps of instructions from you (I am one of these who would love to learn many things, but don't have many people to show me so I am hoping to glean just a little of what my sister has already learned from you) :)
Thank you Nanci! I am going to go get me one of them little treasures. I have always made it the hard way. I think we WERE twins separated at birth.
While I do use the store-bought binding, I like homemade much better! Bias binding made from a print is cuter than the plain stuff, any day!
Post a Comment